Logic Pro × iPhone · iPad

Finish your Logic tracks
together.

Hear Logic Pro on your Mac in real time from an iPhone or iPad on the same Wi-Fi. Loops, solo and position-based Shared Notes are shared in real time, so review and fixes keep moving on the spot.

SYNCRA is a music collaboration app that connects Logic Pro on your Mac with iPhone and iPad.

The iPhone and iPad app is coming soon to the App Store

Mac version 0.1.8 (10) · notarized by Apple · auto-updates / SHA-256 757c37cf8b6f317781e526c8236876216cd21c77a262f0041489aea85270f01d

Requirements

Mac app

  • macOS 14 Sonoma or later
  • Mac with Apple silicon (M1 or later) or an Intel processor
  • Logic Pro

iPhone and iPad app

  • iOS 17 / iPadOS 17 or later
  • iPhone XS, XR or later; iPhone SE (2nd generation) or later
  • iPad (6th generation) or later, iPad mini (5th generation) or later, iPad Air (3rd generation) or later, iPad Pro (11-inch, 10.5-inch, 12.9-inch 2nd generation or later)

* Connect the Mac and the iPhone or iPad to the same Wi-Fi. To hear audio you need the Mac app and Logic Pro (iPhone or iPad alone cannot play it).

Contents

Find a feature

Tap an item to jump to its explanation with the real screens.

Features

A new flow for reviewing your mix.

No need to crowd around the Mac. Hear the same audio, point at the same spot and settle fixes on the spot.

Share your Logic project in real time

Share the project you have open in Logic Pro with your members in real time. Playback position, loops, solo, position-based shared notes and messages reach everyone instantly. See who is online and where they are playing at a glance.

See how it works →

Play any specified spot automatically

Tap ▶ on a message with a position on your iPhone or iPad, and Logic on the Mac jumps to that bar and beat (or minutes and seconds) and starts playing. If the message names a track or region, it is selected too. Hear exactly the spot someone pointed to, without hunting for it.

See how it works →

Hear Logic on iPhone and iPad

SYNCRA Monitor, inserted in Logic Pro, streams uncompressed 32-bit float audio to your iPhone or iPad on the same Wi-Fi. Jump anywhere from the full waveform, skip 10 seconds, return to LIVE in a tap. Stereo / mono / left / right and latency display.

See how it works →

Store three loops

Draw a range on the waveform and store it as A, B or C; recall it with a tap. Loops follow Logic's Cycle, so you can repeat a section without touching the Mac.

See how it works →

Solo any Track

Switch Track solo from your iPhone or iPad. Soloed Tracks are overlaid on the waveform in color.

See how it works →

Shared Notes right where you hear it

Add a Shared Note at the playback position in one tap, by Bar and Beat or by minutes and seconds. Tap a note or message and Logic's Playhead on your Mac jumps there.

See how it works →

Talk with your Members

Messages and Shared Notes with photo and video attachments. Notes can be checklists so nothing to fix is missed. See who is Online and where they are listening.

See how it works →

Available in 7 languages

Japanese, English, German, French, Spanish, Korean and Portuguese (Brazil), using Logic Pro's own terms in each language.

See how it works →

How to use

Every feature, on the real screens

Tap an item in the moving strip above to jump to that feature.

01

Insert SYNCRA Monitor in Logic

How to insert it (3 steps)

1
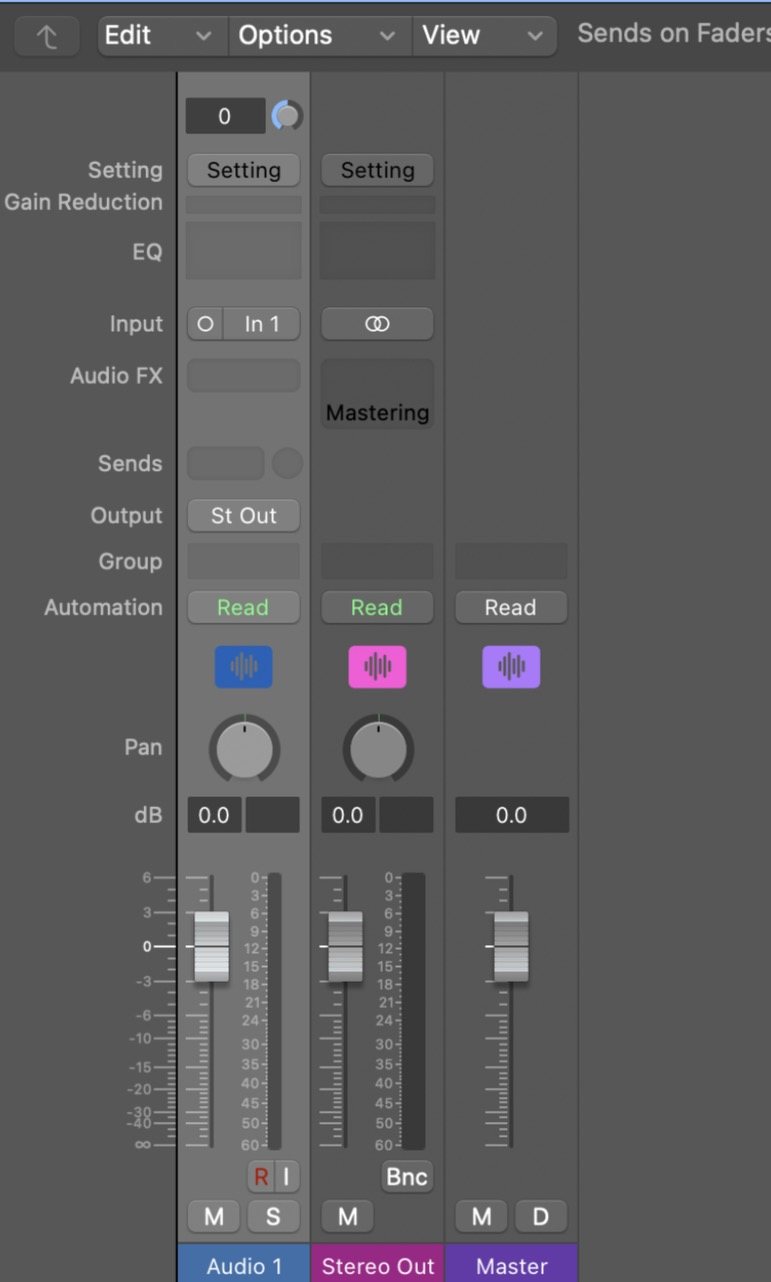
Open Stereo Out in the mixer

In Logic, press X on the keyboard to open the mixer. (1) Find the “Stereo Out” channel strip and (2) the empty Audio FX slot.

  1. The Stereo Out channel strip
  2. The Audio FX slot (click here)
12
2
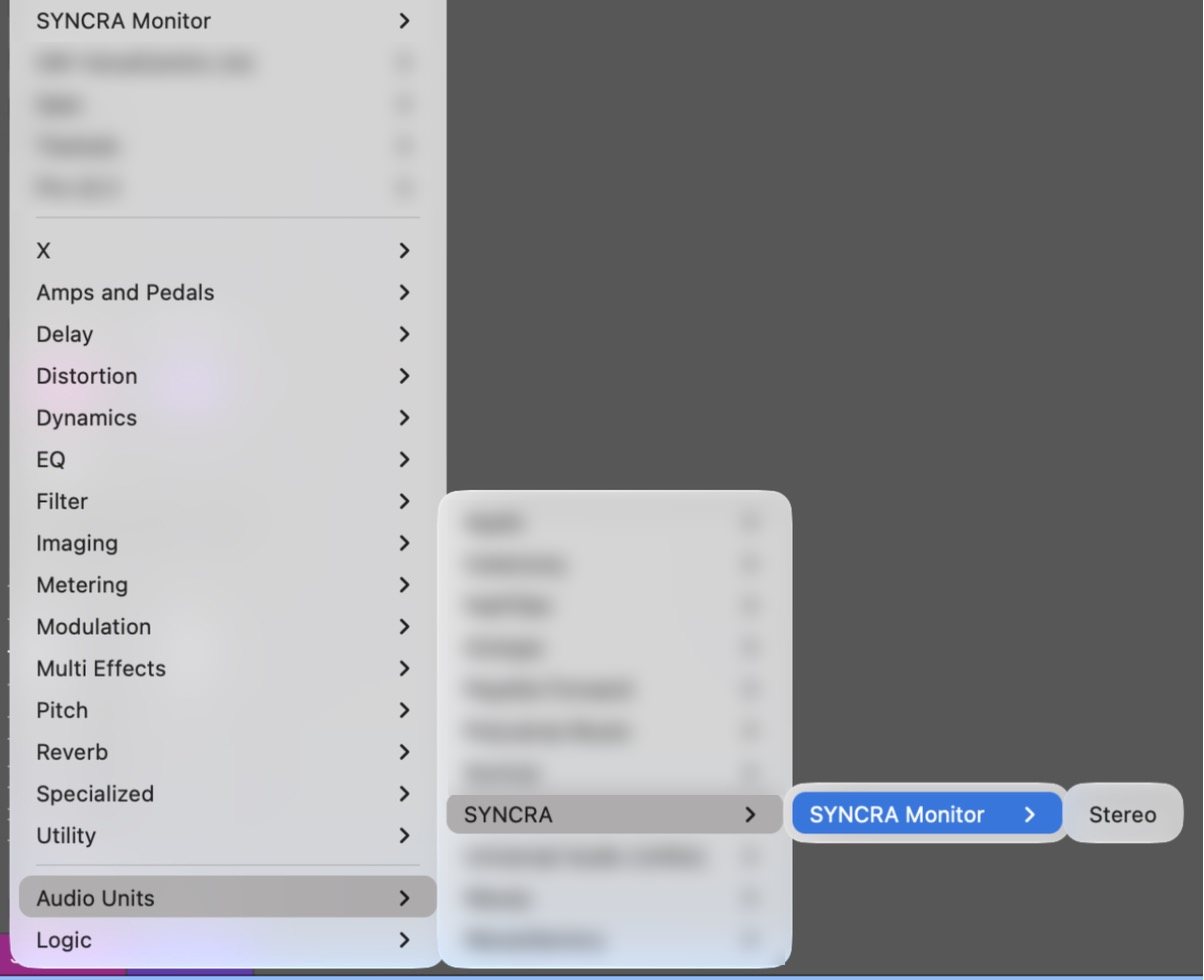
Click the slot and choose from the menu

Click the Audio FX slot and choose (1) Audio Units → (2) SYNCRA → (3) SYNCRA Monitor → (4) Stereo. From the second time on, you can pick SYNCRA Monitor from Recent Items at the top of the menu.

  1. Audio Units
  2. SYNCRA
  3. SYNCRA Monitor
  4. Stereo
1234
3
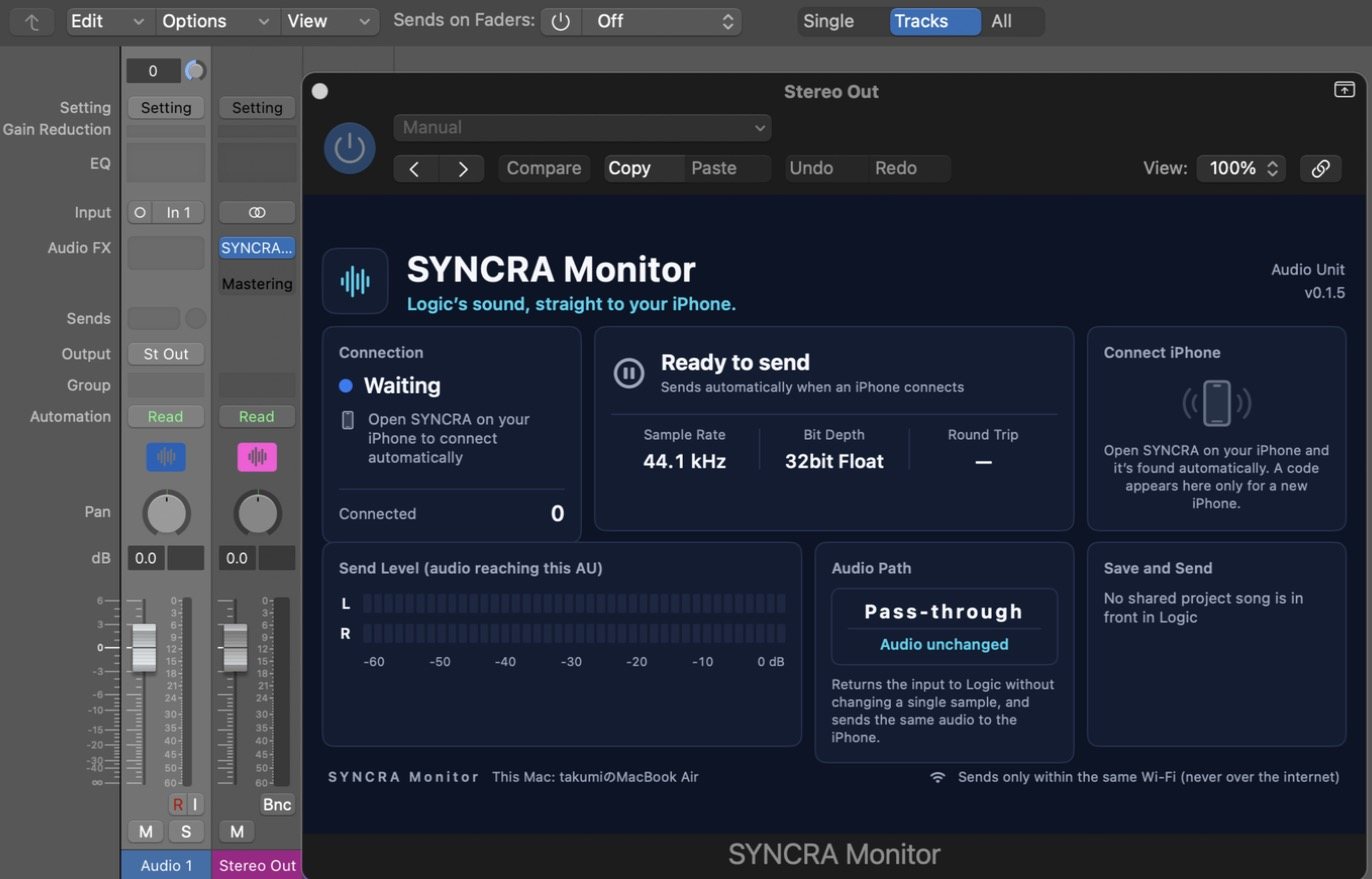
Once inserted, the SYNCRA Monitor window opens

(1) “SYNCRA…” appears in the Audio FX of Stereo Out and (2) the SYNCRA Monitor window opens. (3) When it shows Waiting, you are ready.

  1. SYNCRA is inserted in Audio FX
  2. The SYNCRA Monitor window (Stereo Out)
  3. Waiting = ready
123
12345678
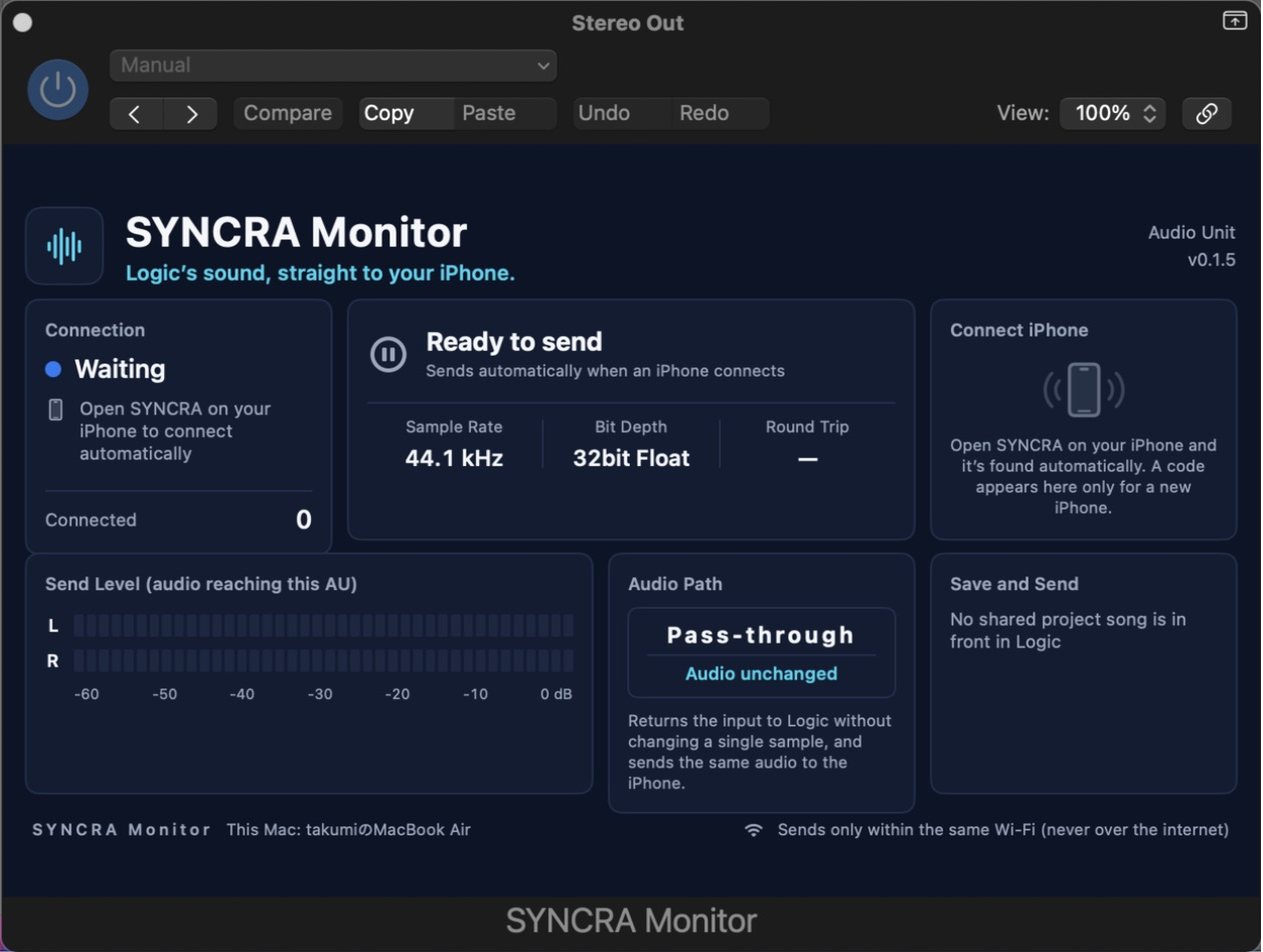
  1. Insert SYNCRA Monitor in the Audio FX of Logic Pro's Stereo Out.
  2. When it shows Waiting, you are ready. Open SYNCRA on your iPhone or iPad and it connects automatically on the same Wi-Fi, so Logic's audio arrives in real time (a number appears here only the first time for each iPhone).
  3. The audio path is Passthrough (no change to the sound): input goes back to Logic unchanged, sample for sample, and the same audio is sent to the iPhone. The sample rate and bit depth (32-bit Float) are shown.

Audio is sent only within the same Wi-Fi, never over the internet.

Parts of the screen

  1. ConnectionStatus such as Waiting or Connected, and how many iPhones and iPads are connected.
  2. SendingWhether audio is being sent to iPhone or iPad (Sending to iPhone / Ready to send). It starts automatically once connected.
  3. Audio formatSample Rate, Bit Depth (32bit Float) and the network Round Trip.
  4. Connect iPhoneFor a new iPhone only, the same 6-digit number appears here and on the iPhone. If they match, press Match.
  5. Send LevelLeft and right meters of the audio reaching this AU.
  6. Audio PathPass-through: input goes back to Logic unchanged, sample for sample.
  7. Save and SendYou can also save and send changes to the Shared Project song in front from here.
  8. Same Wi-Fi onlyAudio is sent only within the same Wi-Fi, never over the internet.
More details (in-app guide)
Prepare your Mac
  1. Keep SYNCRA running.
  2. Insert the “SYNCRA Monitor” plug-in on Logic’s Stereo Out channel strip (from the Audio FX slot, choose “SYNCRA” under “Audio Units”).
  3. If macOS asks for “Local Network” permission, allow it (nothing is sent to the internet).

SYNCRA Monitor does not change the sound at all. It returns the input sound to Logic as is.

Connect on your iPhone
  1. In SYNCRA on your iPhone, open the “Monitor” tab. It automatically finds a Mac on the same Wi-Fi and connects.
  2. Only for the first connection to a Mac, the same 6-digit number appears on your iPhone and on the SYNCRA Monitor screen on your Mac. If they are the same, click “Match” on the Mac screen. If they differ, click “No Match”.
  3. From the second time on, it connects automatically without a number.
What you can check on your Mac screen
  • “Connection”: states such as Waiting or Connected.
  • “Ready to send” / “Sending to iPhone”: whether audio is being sent to your iPhone.
  • “Connect iPhone”: the connected iPhone and a “Disconnect” button.
  • “Send Level”: left and right meters for the audio reaching this AU.

Playing, stopping, moving, looping, and exporting the whole-song waveform from your iPhone require that SYNCRA is running on your Mac and that Accessibility is allowed. While the waveform is being exported, Logic is brought to the front and operated. Be careful if you are doing other work on your Mac.
02

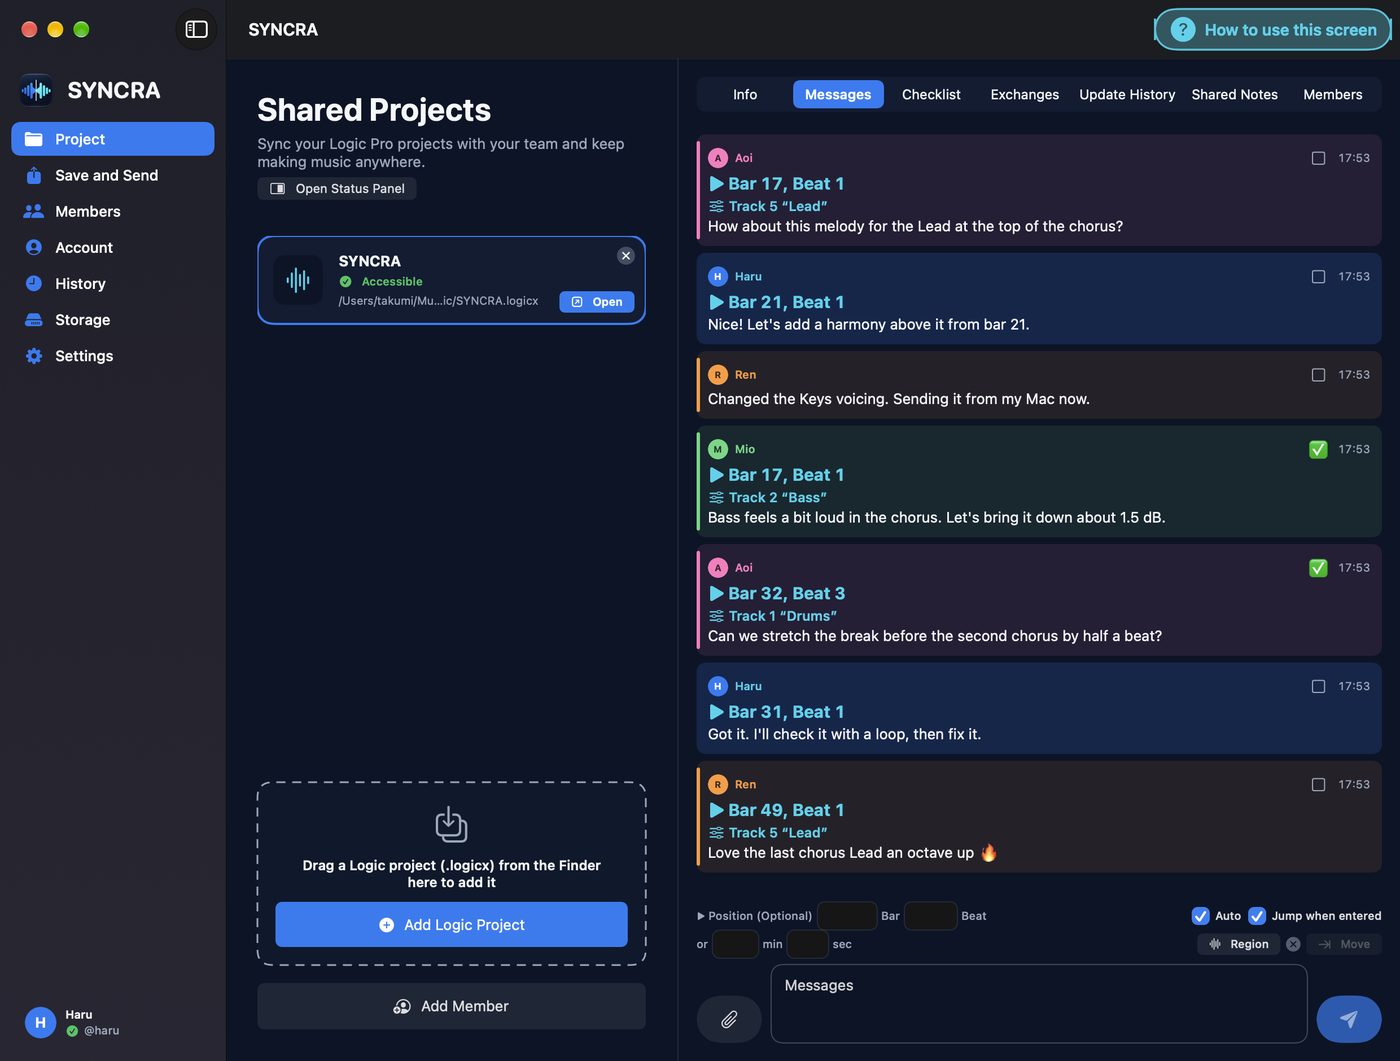
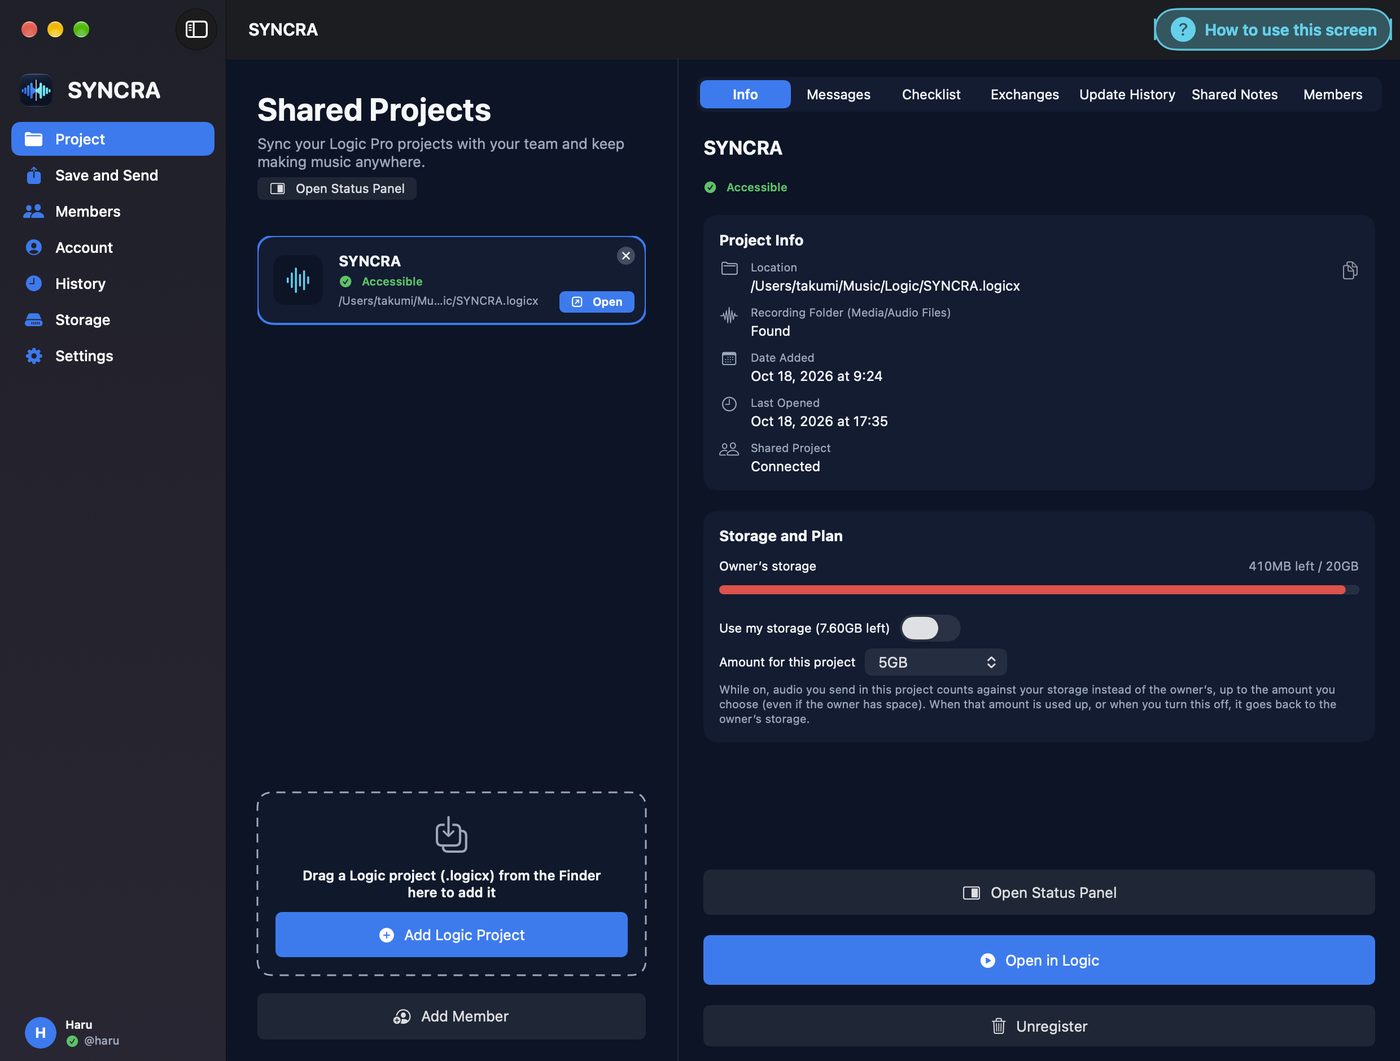
Register a Logic project

123456789
  1. Open Projects and press Add Logic Project. You can also drag a .logicx file in from Finder.
  2. Once added, you see its location, whether the Recording Folder (Media/Audio Files) was found, the date added and when it was last opened.
  3. Open in Logic launches Logic. Add Member lets you invite people right away.

Unregister only removes it from SYNCRA; your Logic project itself is not deleted.

Parts of the screen

  1. SidebarSwitch between Project, Save and Send, Members, Account, History, Storage and Settings.
  2. Open Status PanelOpens the small status panel (SYNCRA Status) that sits next to Logic.
  3. Registered song cardStatus (Accessible / Needs update / Not accessible). Open opens it in Logic; ✕ removes it from the list (the file stays).
  4. Register a songDrag a .logicx from Finder into the dashed area, or choose Add Logic Project (⌘N).
  5. Add MemberInvite members to this song (QR code, invite code or SYNCRA ID).
  6. Seven tabsInfo, Messages, Checklist, Exchanges, Update History, Shared Notes and Members. New items show as red numbers.
  7. Project infoLocation, Recording Folder (Media/Audio Files), date added, last opened and Shared Project connection.
  8. ActionsOpen Status Panel, Open in Logic, Unregister (your Logic file is not deleted).
  9. How to use this screenOn every screen, the top-right button shows the steps for that screen.
More details (in-app guide)
How to add one (2 ways)
  1. Open “Project” in the list on the left.
  2. Method A: Drag a .logicx from Finder into the dotted frame on the screen (you can drag several at once).
  3. Method B: Click “Add Logic Project” (⌘N), choose the file, and click “Add”.

Only the file’s location is registered. The Logic file itself stays where it is.

Reading and using the cards
  • There are 3 states. “Accessible” means no problem. “Needs update” means the location may have changed. “No access” means you need to choose the location again.
  • “Open” at the bottom right of a card opens that song in Logic. Any other song currently open in Logic is closed. If there is unsaved work, Logic asks you to confirm.
  • The ✕ at the top right of a card removes it from the list on this Mac. The Logic file, the Shared Project on the server, and the members all remain.
The 7 tabs on the right
  • “Info”: Check the location, Recording Folder, date added, and so on, and use “Open in Logic” and “Unregister”.
  • “Messages”, “Checklist”, “Exchanges”, “Update History”, “Shared Notes”, and “Members”: These are explained on the following pages.
  • The “Messages”, “Exchanges”, “Shared Notes”, and “Members” tabs show the number of new items as a red number badge.
If it doesn’t work
  • “This project has already been added”: The same song cannot be added twice.
  • “Choose a Logic Pro project (.logicx)”: Choose a .logicx, not a folder.
  • “No access”: Choose the location again with “Choose Location Again” on the “Info” tab to fix it.
03

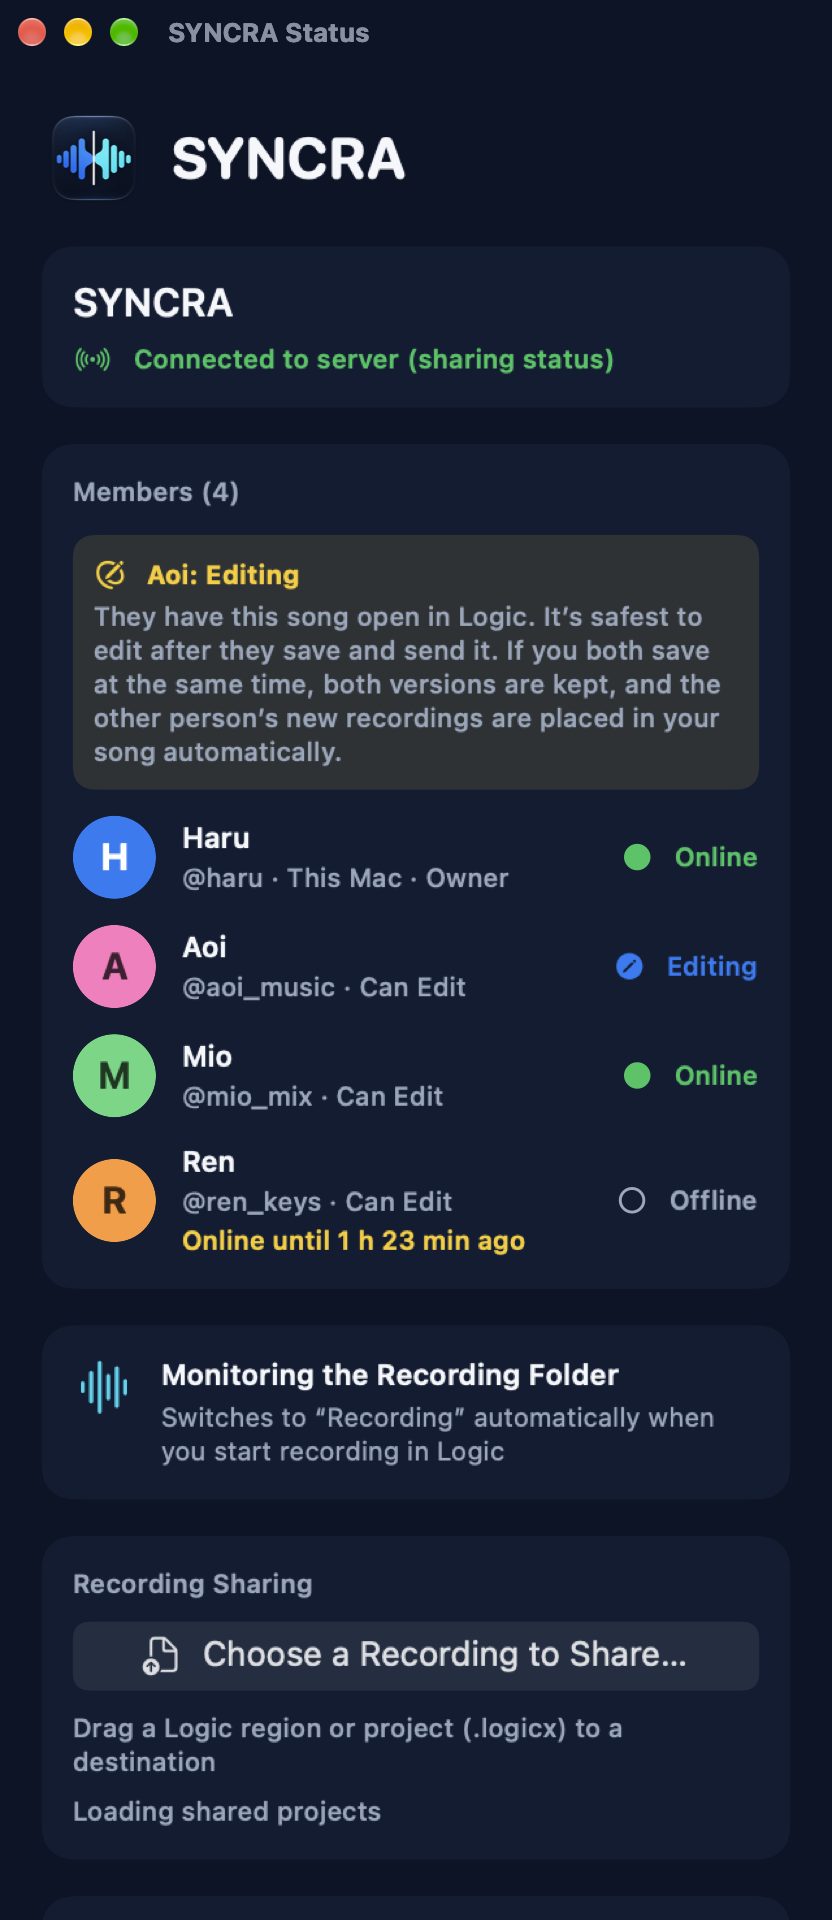
Status Panel: see Members in real time

123456
  1. Press Open Status Panel to show a small status window.
  2. It lists the server connection and which Members are Online or Offline. Your own status is shared with Members in real time.
  3. While the Recording Folder is watched, starting a recording in Logic switches you to Recording automatically. You can also send a recording with Choose and Share Recording…

Change the panel's display size in Settings so it stays out of the way.

Parts of the screen

  1. ConnectionWhether you are connected to the server and sharing your status with Members.
  2. MembersName, @ID, role and status (Online, Recording, Editing, Syncing, Offline).
  3. StatusA yellow warning appears while someone is editing or recording.
  4. Recording Folder watchWhen you start recording in Logic, your status switches to Recording automatically.
  5. Choose and Share RecordingPick a recording and send it to Members. After a take, Share this take also appears.
  6. Drag to sendDrag a Logic Region or project (.logicx) onto the drop area. It is sent with its recording position.
More details (in-app guide)
Open it
  1. Click “Open Status Panel” on the “Project” screen.
  2. You can also open it from “Open Status Panel” on the “Info” tab or the same button in “Settings”.
  3. The panel is shown in front of Logic, and its position and size are remembered.
What you can see
  • “Members”: Name, @ID, role, and status (“Online”, “Recording”, “Editing”, “Syncing”, “Offline”). When someone else is editing or recording, a yellow notice appears.
  • Recording Folder monitoring: statuses such as “Monitoring the Recording Folder” and “Recording detected”.
  • “Messages”: The latest 5 and the input field.
  • “Received Audio”: audio members sent and its progress. When the song is in front in Logic, it is placed at its recorded position automatically.
Share a recording
  1. When a recording ends, “Share This Take” appears. Click it to share.
  2. With “Choose a Recording to Share…”, you can also choose and share other recordings.
  3. You can also send by dragging a Logic region into the send target on the panel (it is sent with its recording position information).
  4. A send that stopped partway can be continued with “Resume”.
Auto Sync switches (whole project)
  • “Send automatically when you save (⌘S) in Logic”
  • “Receive members’ newer versions automatically”
  • “Save and send when recording finishes”
  • “Ask whether to save and send after each edit or recording”
  • “Also reopen the open song as the newer version” (it waits if there is unsaved work)

All switches are on by default.

04

Messages with a position

12345678
  1. Open the Messages tab, type below and send.
  2. Enter a Bar and Beat, or minutes and seconds, under Position (optional) and the message arrives with that position.
  3. Press ▶ Bar / Beat in a message and the Playhead in Logic moves there. Attach photos and videos with the clip button.

The Track name is shown too, so everyone knows which part you mean.

Parts of the screen

  1. Message with a positionPress ▶ Bar / Beat and the Playhead in your Logic moves there.
  2. TrackShows which Track the message is about.
  3. Check □Adds ✅ and puts the message on the Checklist tab (kept only on this Mac).
  4. PositionEnter Bar and Beat, or minutes and seconds, before sending.
  5. Auto · Move on entryAuto fills in where you stop the Playhead in Logic. Move on entry moves the Playhead to the position you type.
  6. Region · GoRegion attaches a Logic Track and Region. Go moves the Playhead there before sending.
  7. Attach photos and videosUp to 10 per message (photos 50 MB, videos 1 GB). You can also drag them into the field.
  8. SendReturn sends (⌥Return for a new line). Up to 2,000 characters.
More details (in-app guide)
Send a message
  1. Open the project’s “Messages” tab.
  2. Enter your message in the field at the bottom and send it with Return (⌥Return for a line break). You can send up to 2000 characters.
  3. Choose photos and videos with the 📎 button, or drag them into the input field. Up to 10 per message; photos up to 50 MB and videos up to 1 GB. If there is an attachment, you can send even with an empty body.

“View Only” members cannot send photos or videos (they can send text).

Attach a position
  1. Enter a position in “Bar” and “Beat” (or “min” and “sec”) above the input field. Bar is 1–9999, Beat is 1–64, min is 0–1439, and sec is 0–59.
  2. Turn on “Auto” and when you stop the playhead in Logic, that position is entered automatically.
  3. Click “Region” to choose a track and region in Logic and attach them.
  4. Click “Move” and the Logic playhead moves to that position before you send.

When you click a received row that has a position, your Logic playhead moves to that position (Accessibility permission is required).

05

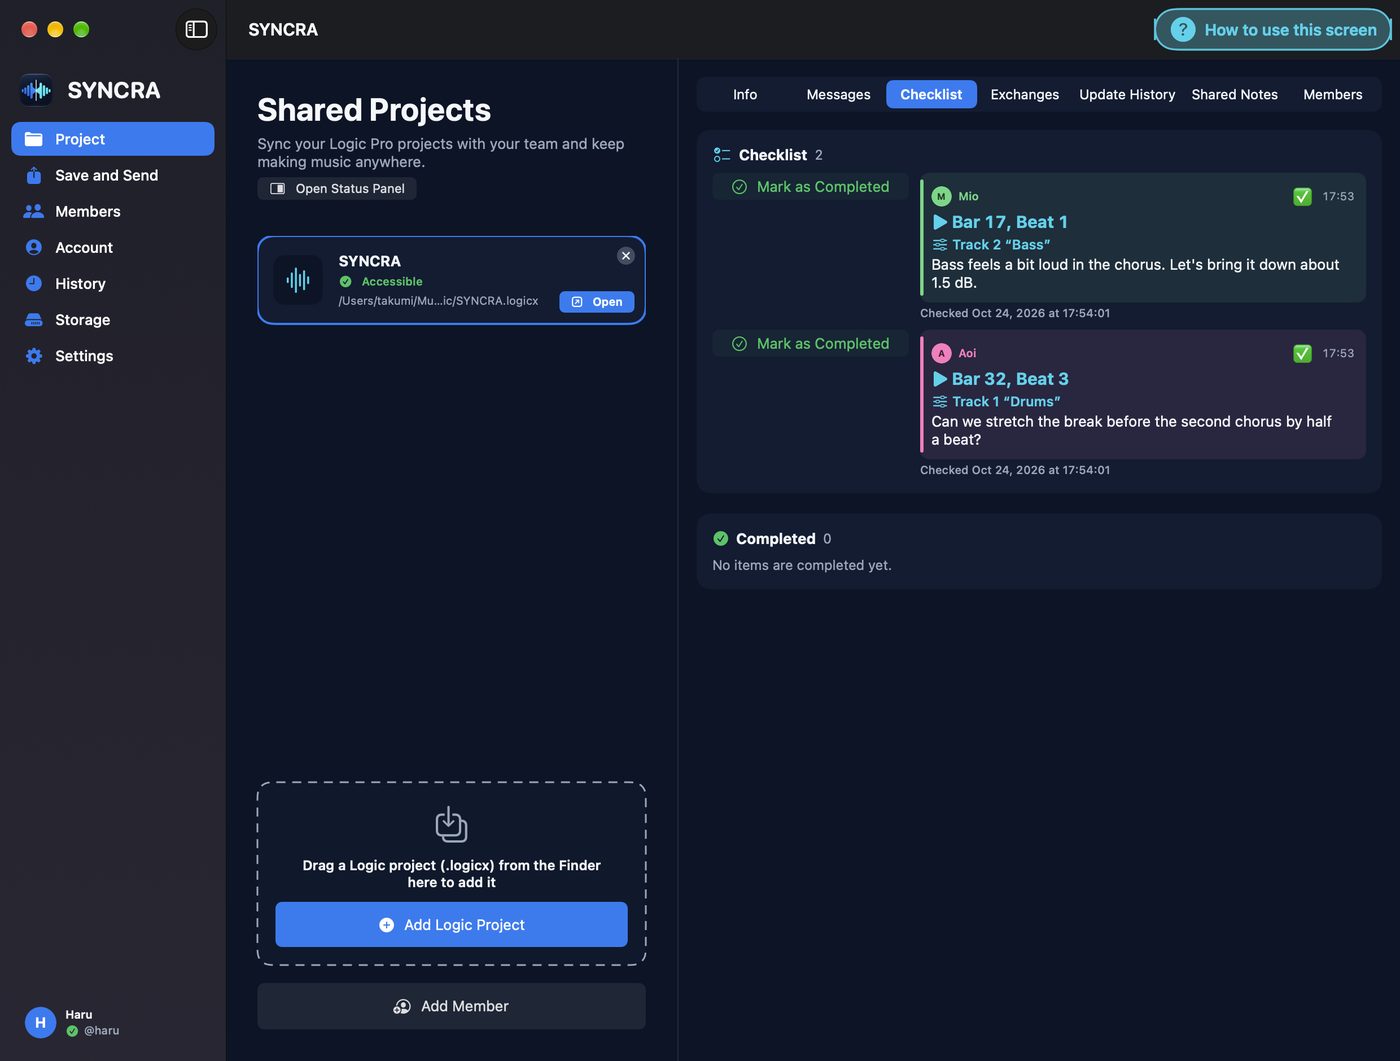
Checklist: confirm what needs fixing

12345
  1. Tick the box on the right of a Member's message and it is collected in Checklist.
  2. When it is fixed, press Mark as Done and it moves to Done below.
  3. The date and time of each check are kept, so nothing is missed.

Return to Checklist puts an item back at any time.

Parts of the screen

  1. ChecklistMessages you ticked ✅ (kept only on this Mac; others can't see it).
  2. Mark as DonePress when finished; the item moves to Done.
  3. Checked itemThe original message (position, Track, text). Press the position to move Logic there.
  4. Checked atWhen you ticked it.
  5. DoneFinished items. Return to Checklist puts them back.
More details (in-app guide)
Checklist (your own list)
  1. Click the □ at the top right of a message row and a ✅ is added, and the message goes into the “Checklist” tab. Click it again to remove it.
  2. In the “Checklist” tab, move finished items to “Completed” with “Mark as Completed”. You can bring them back with “Back to Checklist”.

The message checklist is a record on this Mac only and is not visible to others (checks on Shared Notes are visible to all members).

What Checklist and Completed mean
  • ✅ (Checklist): things to act on later. Click the □ at the message’s top right to get ✅ and add it to the "Checklist" tab. Click again to remove it.
  • "Completed": when you have acted on it, click "Mark as Completed" in the "Checklist" tab. It moves to the "Completed" part of the same tab. "Back to Checklist" undoes it.
  • Only you see it: the message checklist is a record on this Mac only and the others cannot see it (checks on shared notes are visible to every member).
06

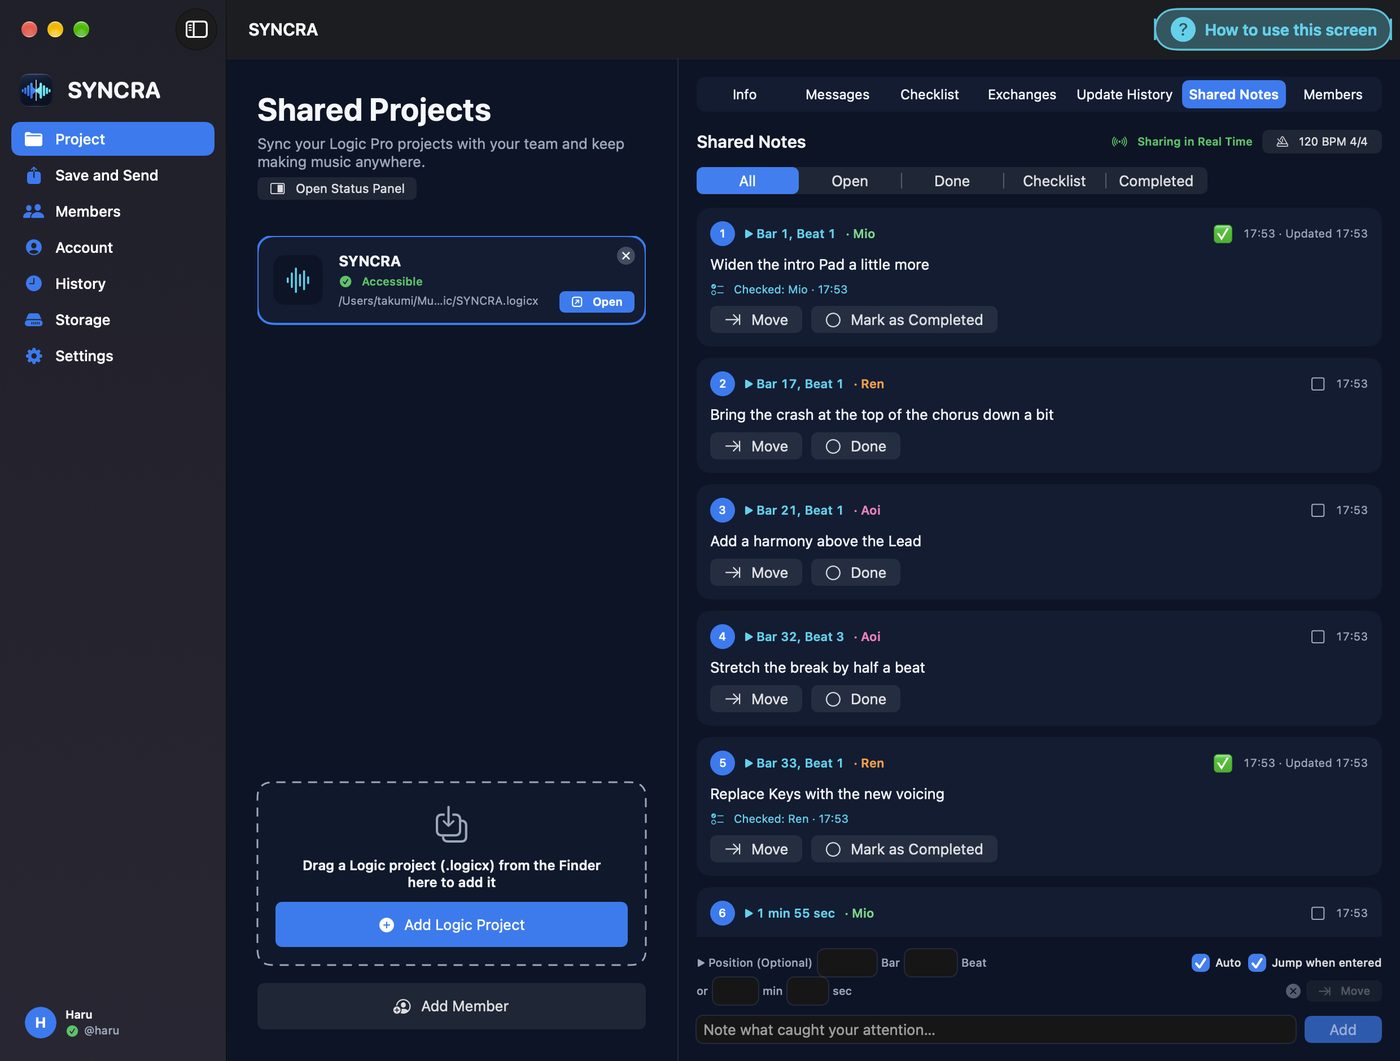
Shared Notes, shared in real time

123456789
  1. Notes with a position are shared in real time on the Shared Notes tab (Sharing in real time is shown at the top right).
  2. Enter a position and a note below, then press Add. The song's tempo (BPM and time signature) is shown as well.
  3. Filter by All / Open / Done / Checklist / Done (applied), press Go to move the Playhead, and mark Done once fixed.

A position can be given as Bar and Beat or as minutes and seconds.

Parts of the screen

  1. Sharing in real timeNotes reach every Member within seconds, and you see who is typing.
  2. TempoTempo and time signature used to convert positions. Press to change.
  3. FilterAll, Open, Done, Checklist, Executed.
  4. Number and positionNumber in position order, Bar and Beat, and who wrote it.
  5. ✅ and time✅ puts the note on everyone's Checklist. Written and updated times.
  6. Go · Return to ChecklistGo moves Logic's Playhead there. Ticked notes show Mark as Executed / Return to Checklist.
  7. DoneMarks the task as finished (visible to everyone). Reopen puts it back.
  8. PositionBar and Beat, or minutes and seconds. Empty means Bar 1, Beat 1.
  9. Write a noteType it and press Add (⌘Return).
More details (in-app guide)
Write a note
  1. Open the project’s “Shared Notes” tab.
  2. Enter a position (Bar and Beat), enter the content in “Note what caught your attention…”, and click “Add” (⌘Return). If the position is empty, the note is written at Bar 1, Beat 1.
  3. The note appears for all members within a few seconds. The names of people who are typing are shown too.
Working with notes
  • Click “Move” and the Logic playhead moves to that position.
  • Mark a note complete with “Done”, and bring it back with “Resume”. You can filter with “Open” and “Done”.
  • Click the ✅ (at the top right of a note) to add it to all members’ checklist. Filter with “Checklist”, and move items to “Completed” with “Mark as Completed”. You can bring them back with “Back to Checklist”.
  • With the trash can, you can delete only notes you wrote (they remain in the history).

Checks on Shared Notes are shared with all members. They are separate from the message checklist (yours alone).

Done, Checklist and Completed: what they mean
  • "Done": the note’s matter is settled. Everyone can see it. "Resume" puts it back to Open.
  • "Checklist": things to act on later. Tap the □ at the note’s top right to get ✅ and add it to everyone’s checklist. Tap again to remove it.
  • "Completed": when you have acted on a ✅ note, tap "Mark as Completed". If that was a mistake, "Back to Checklist" undoes it.
  • Filters: "Open" = not done yet, "Done" = done, "Checklist" = ✅ and not yet completed, and "Completed" = ✅ and completed.

On a ✅ note, the button changes to "Mark as Completed" / "Back to Checklist" (on a note without ✅ it is "Done" / "Resume"). All of this is shared with every member.

When edited at the same time

When the same note is edited at the same time, “Their version” and “Your version” are shown. Choose “Use Their Version” or “Use Your Version”.

Tempo setting

The tempo and time signature used to convert positions can be changed with the button at the top right of the screen, such as “120 BPM 4/4” (a constant tempo is assumed). For songs whose tempo changes partway through, the displayed positions may be off.

07

Send and receive audio (Exchanges)

1234
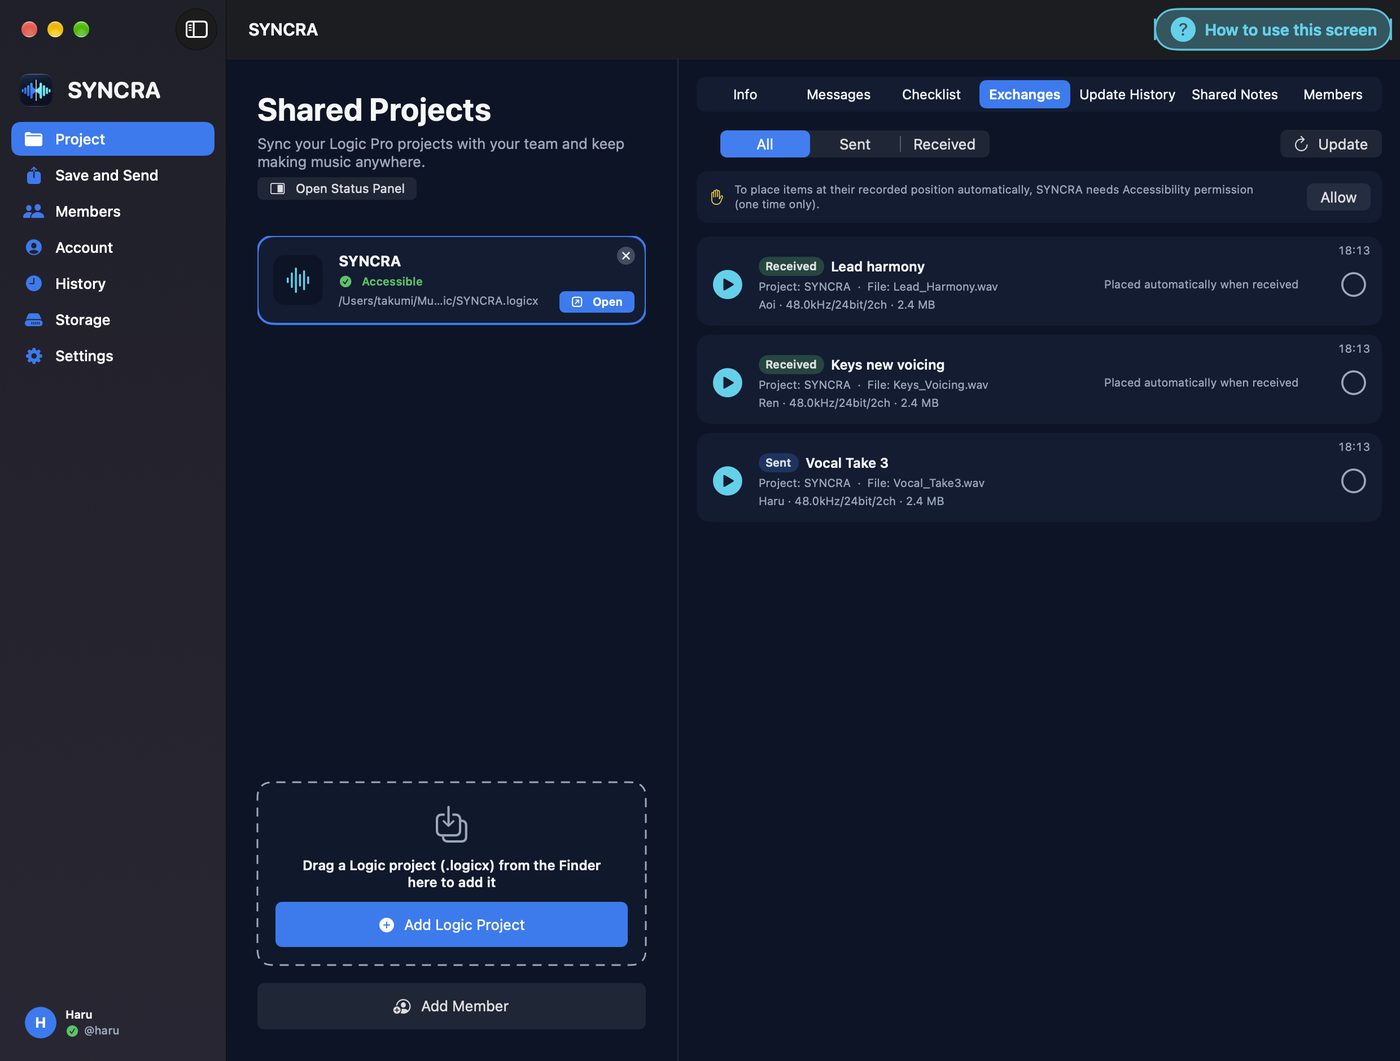
  1. The Exchanges tab lists audio you sent and received. Filter by All / Sent / Received.
  2. Drag a Region from Logic onto the Status Panel to send it to Members.
  3. To place audio at the recording position automatically, macOS needs to allow SYNCRA under Accessibility (once only: press Allow).

Received audio is placed at its recorded position automatically once the song is in front in Logic.

Parts of the screen

  1. FilterAll / Sent / Received, newest first.
  2. RefreshReloads the list.
  3. Accessibility permissionAllow once so received audio can be placed at its recording position in Logic automatically.
  4. Exchanges list▶ previews. Received audio is added automatically as a new Track at its recorded position when the song is in front in Logic.
More details (in-app guide)
The “Exchanges” tab
  1. Open the project’s “Exchanges” tab. Audio you sent and received is listed newest first (filter with “All”, “Sent”, and “Received”).
  2. Preview with the ▶ at the left of a row. The first time, it is fetched from the cloud and plays after the content is checked.
  3. Received audio is copied into your song’s recording folder (Audio Files) automatically and, while the song is in front in Logic and not playing or recording, placed as a new track at its recorded position. Once placed, the song is saved and sent automatically.
  4. The right side of the row shows the progress, such as “Placed automatically when received” or “Placed at its recorded position in your song”. The ○ at the far right is a checkmark for your own record (not visible to others).
Allow Accessibility (only once, at the start)
  1. To control Logic, SYNCRA needs permission in macOS “Accessibility”.
  2. When an “Allow” button appears on the screen, click it and follow the macOS instructions.
If it doesn’t work
  • If “Place in My Song” is unavailable, check the versions in “Update History” and try again.
  • If a new version arrived but did not switch automatically, click “Receive and Open in Logic” in the Status Panel.
08

Update History and Auto Sync

123
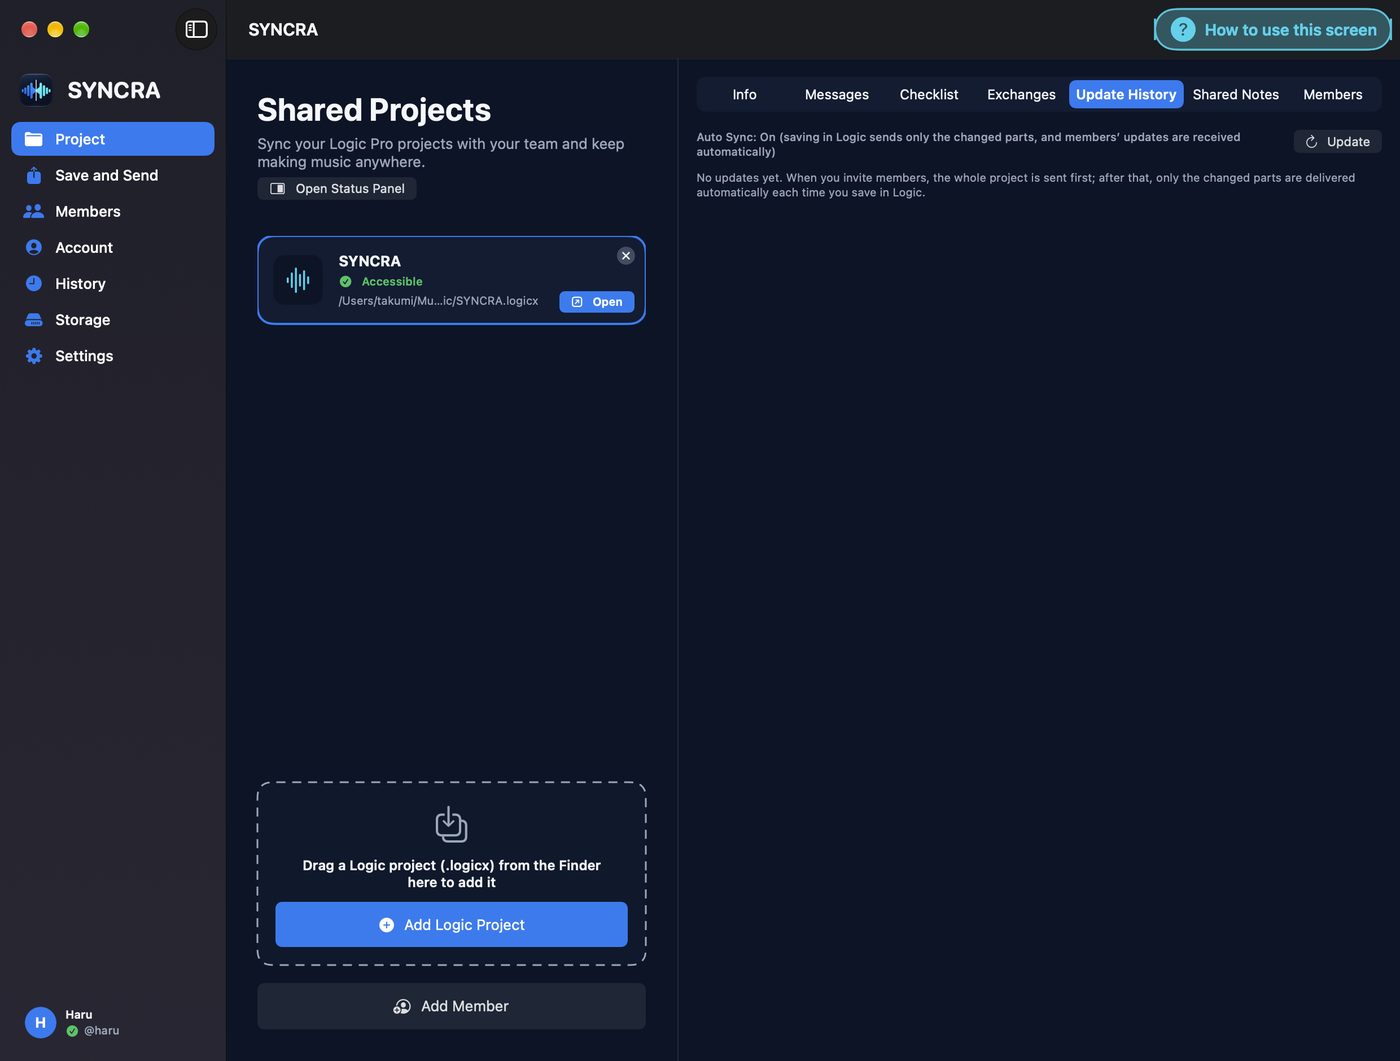
  1. The Update History tab shows updates to the project.
  2. While Auto Sync is on, saving in Logic sends only what changed to Members, and Members' updates arrive automatically.
  3. When you invite a Member, the whole project is sent first. Press Refresh to check the latest.

You never have to send the whole project again each time.

Parts of the screen

  1. Auto SyncWhile on, saving in Logic sends only what changed, and Members' updates arrive automatically.
  2. RefreshLoads the latest versions (also refreshes every 20 seconds).
  3. VersionsVersions made by Auto Sync (r1, r2…). Check moves Logic to what changed in that version.
More details (in-app guide)
The “Update History” tab
  • Versions created by Auto Sync (r1, r2…) are listed newest first. The list refreshes automatically every 20 seconds.
  • Click “Check” to open that song in Logic, select the regions of the audio updated in that version, and move the playhead.
  • When there are many unchecked versions, you can mark them all as checked at once with “Mark All as Checked”.
  • “Place in My Song” on a member’s audio row places that audio as a new track at its recorded position in your latest song. After placing it, saving (⌘S) sends it.
The difference between “Update History” and “History”

“Update History” on the project screen is the list of versions of that song. “History” in the left list is a combined list of members’ actions across all projects.

09

Save and Send: decide what gets sent

123
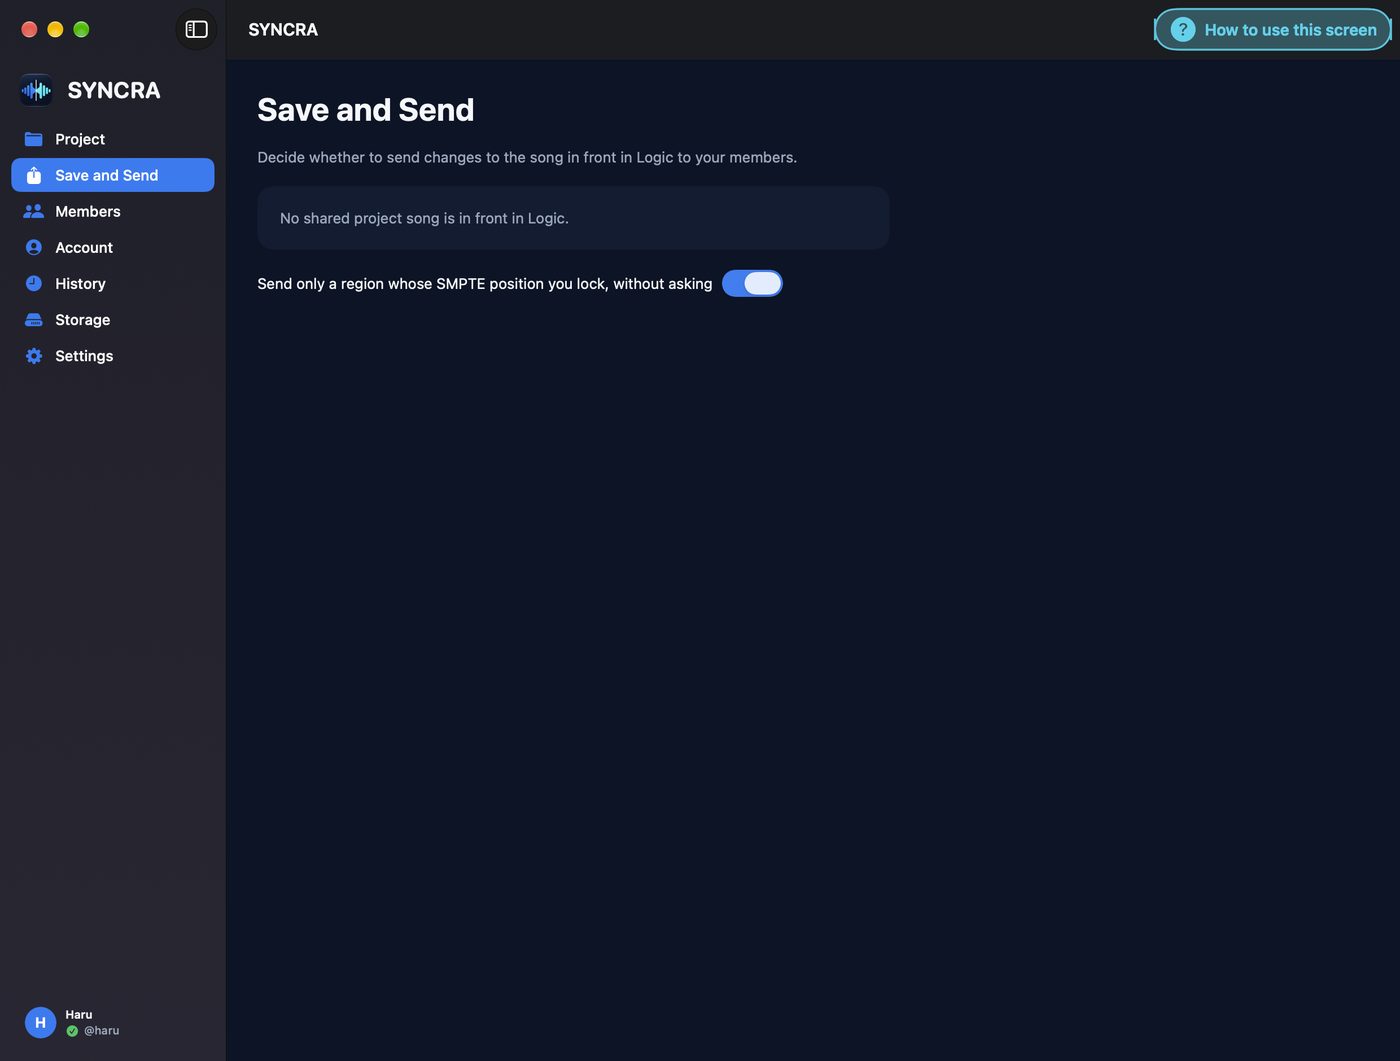
  1. Open Save and Send on the left to decide whether changes to the song in front in Logic are sent to Members.
  2. If no Shared Project song is in front in Logic, a message says so.
  3. With the switch on, locking a Region’s SMPTE position sends only that Region’s audio, without asking (the project isn’t saved).

Send all other changes to the project with “Save and Send”.

Parts of the screen

  1. Save and SendDecide whether changes to the song in front in Logic are sent to Members.
  2. Song in frontShows No changes / Unsaved changes and so on, or that no Shared Project song is in front.
  3. SMPTE lock sends that Region onlyA Region whose SMPTE position you lock has only its audio sent, without asking (the project isn’t saved). Send other changes together with “Save and Send”.

How to lock the SMPTE position in Logic

Locking the SMPTE position is a Logic feature that fixes a region at a time measured from the start of the song (it stays at that time even if you change the tempo). In SYNCRA, locking a region sends only that region’s audio, without the confirmation pop-up (the project isn’t saved; members receive it in Exchanges and can place it where it was recorded. On by default; you can switch it with the toggle on the Save and Send screen above). Other changes are sent with “Save and Send”. After a recording you have 10 seconds to lock it.

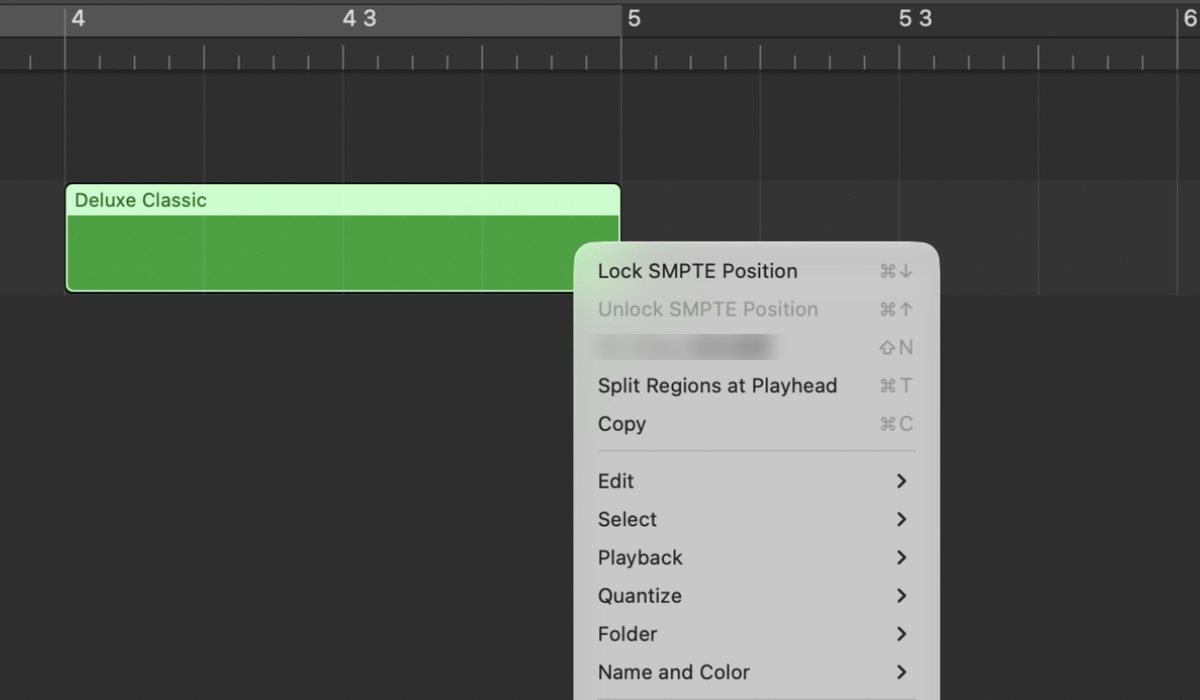
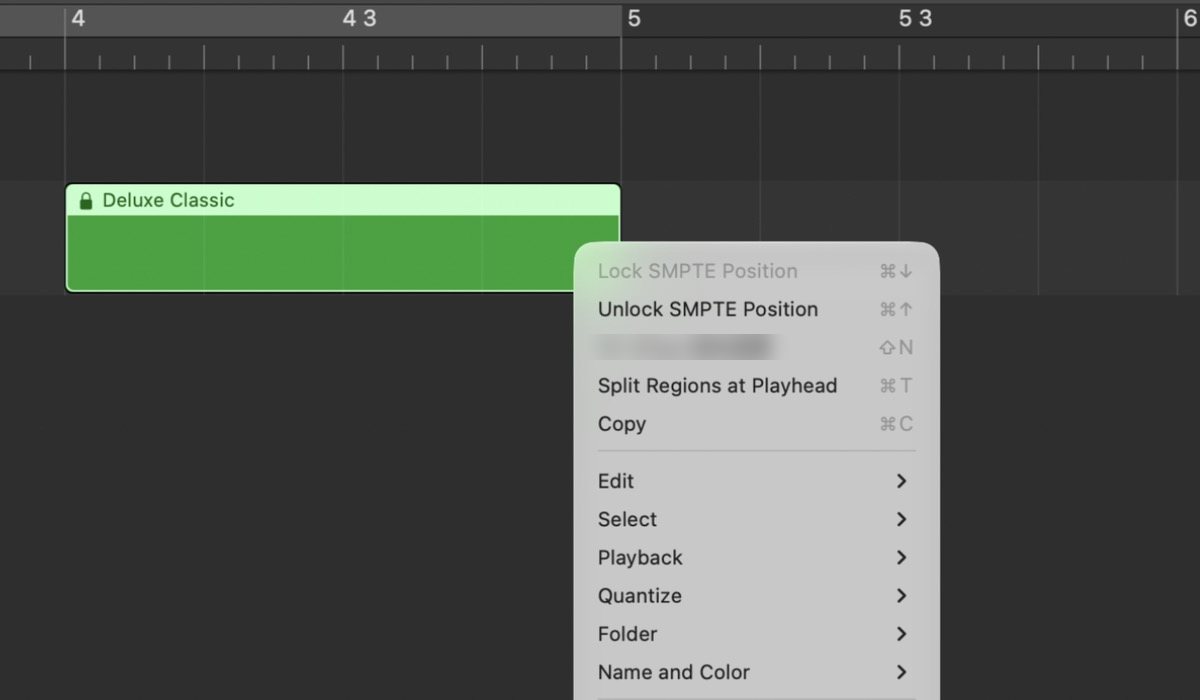
1
Right-click the region and choose Lock

(1) Right-click the region you want to lock. In the menu that appears, choose (2) Lock SMPTE Position near the top. You can also select the region and press ⌘↓.

  1. The region to lock (right-click it)
  2. Lock SMPTE Position (⌘↓)
12
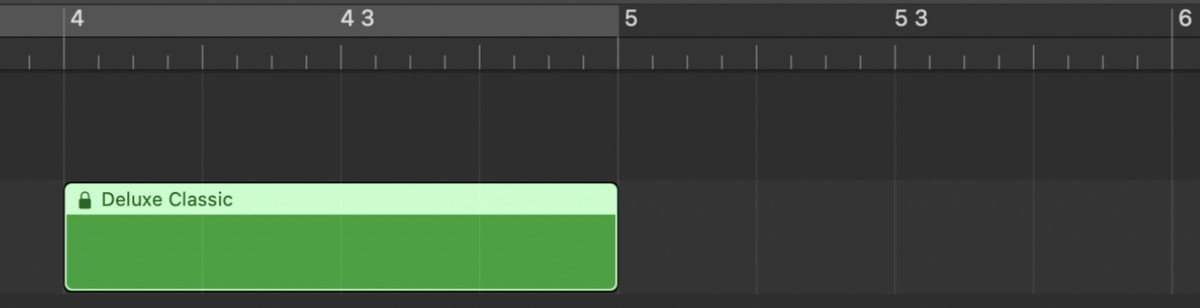
2
Once locked, a lock mark appears

A locked region shows a lock mark (1) to the left of its name.

  1. Lock mark = locked
1
3
To unlock

Right-click the locked region again and choose (1) Unlock SMPTE Position (⌘↑). While a region is locked, Lock SMPTE Position is grayed out.

  1. Unlock SMPTE Position (⌘↑)
1
More details (in-app guide)
The basic flow
  • SYNCRA checks the songs of Shared Projects every 6 seconds. When the save state changes and then stays steady for about 15 seconds, it sends only the parts that changed.
  • Members’ newer versions are checked every 20 seconds and received automatically.
  • A received version is assembled next to your song automatically. If it is not open in Logic, the switch happens right away; if it is open, the switch happens when you close it.
The confirmation pop-up
  1. When you edit a song in Logic and stop for about 2 seconds, “Save this change and send it to the members?” appears at the top center of the screen (it does not appear during playback or recording). After you stop recording, it reads “Save the recording and send it to the members?”.
  2. Click “Save and Send (Y)” to save the project in Logic and send every change not yet sent. Click “Don’t Send (N)” to neither save nor send (your work in Logic stays as it is).
  3. You can also answer with keys. Y or ← means “Save and Send”, and N or → means “Don’t Send”. Press a key on the same side twice to confirm. If you press the opposite side in between, it starts the choice over. esc means “Don’t Send” immediately; Enter and Space cannot be used.

For edits, the confirmation is asked only once, when the song becomes unsaved. After you choose “Don’t Send”, it is not asked again until you save. For recordings, it is asked for every take.

A region whose SMPTE position you lock is sent on its own, automatically

When you lock a region’s SMPTE position, only that region’s audio is sent, without a confirmation. The project is not saved (other changes are not sent). On members’ Macs it is placed at its recorded position automatically (it is listed in “Exchanges”). After a recording, you have a 10-second grace period to lock. You can switch this on or off with the switch “Send only a region whose SMPTE position you lock, without asking” on the “Save and Send” screen on the left (on by default).

The “Save and Send” screen in the left list
  • The state of the song in front in Logic is shown large, one at a time. While a confirmation is pending, the item in the list gets a light-blue ●.
  • When “There are unsaved changes” or “There are changes that haven’t been sent” is shown, you can always send every change to the project with “Save and Send”.
  • If you don’t want the confirmation to appear, turn off “Ask whether to save and send after each edit or recording” in the “Status Panel”. Even when it is off, saving in Logic (⌘S) sends the song.
Send the whole project manually

With “Send Whole Project” in the Status Panel, you can send what you saved in Logic at any time. A file identical to the one sent before is not sent. Save in Logic first (⌘S). You can also send by dragging a .logicx from Finder to the send target.

If another person saves the same song at the same time, both versions are kept. The other person’s new recordings are placed in your song automatically. Any that could not be placed can be brought in with “Place in My Song” in “Update History”.

10

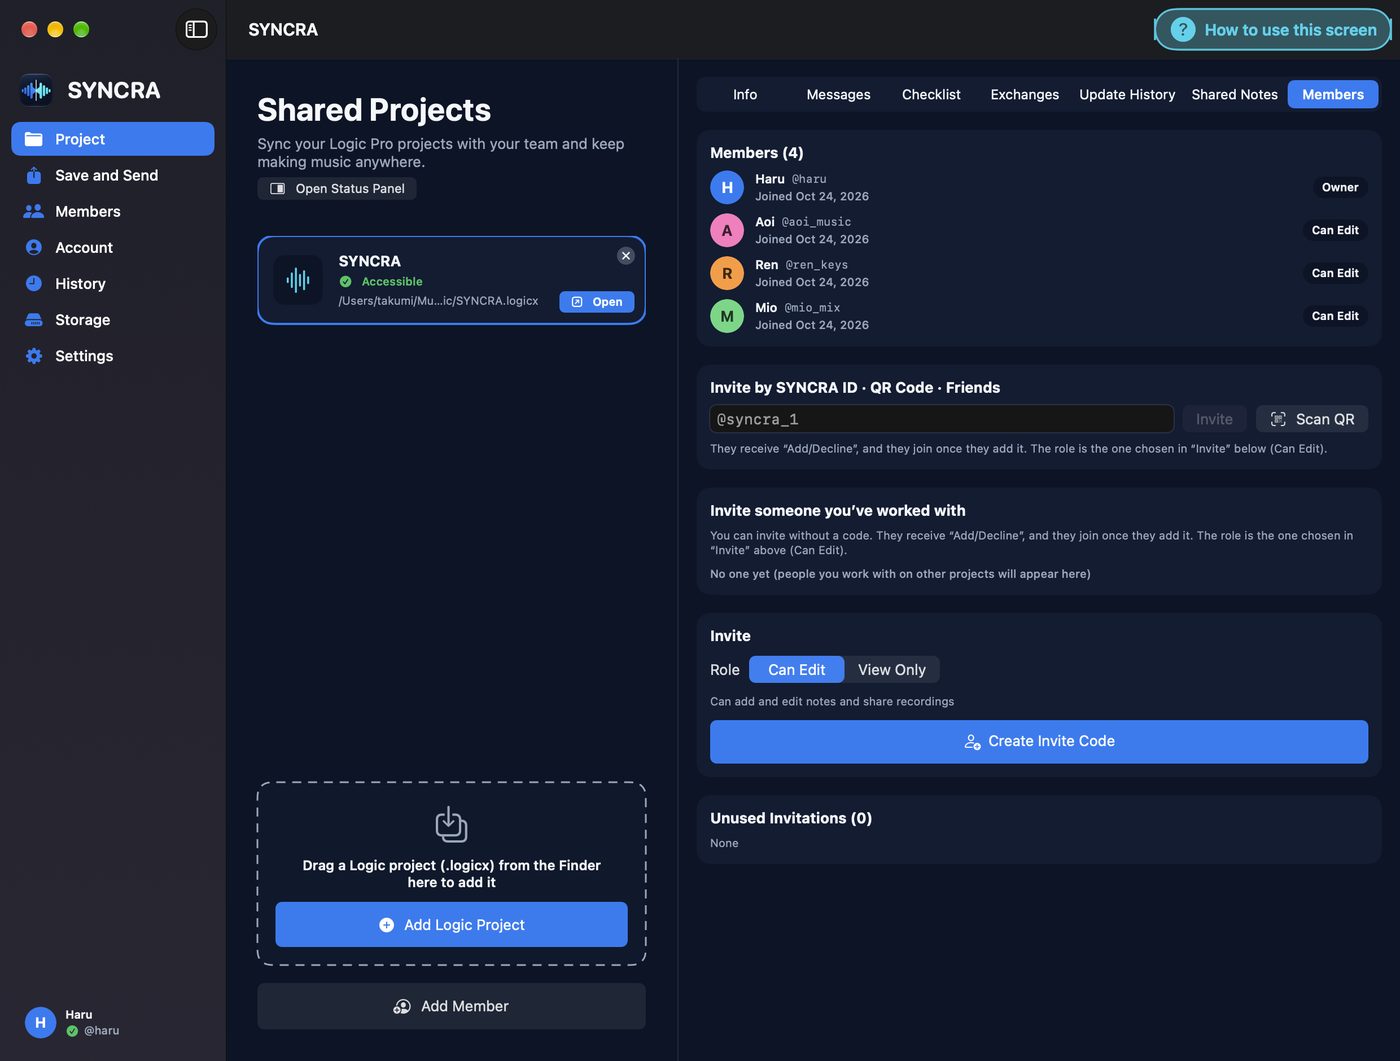
Members and permissions in a project

123456
  1. On the Members tab, check the Owner and each Member (Can Edit / View Only).
  2. Enter a SYNCRA ID and press Search, or Scan QR, to find and invite someone. People you have worked with can be invited without a code.
  3. Under Invite choose a permission (Can Edit / View Only) and press Create Invite Code.

Can Edit allows adding and editing notes and sharing recordings.

Parts of the screen

  1. Member listName, @ID and join date (up to 4 per project).
  2. RoleOwner, Can Edit, View Only.
  3. Invite by SYNCRA ID or QREnter their ID or scan their QR; they receive Add / Decline.
  4. People you've worked withInvite them without a code.
  5. Choose permissionCan Edit (add and edit notes, share recordings) / View Only.
  6. Create Invite CodeGive the code to let them join.
More details (in-app guide)
Add a member (owner)
  1. Click “Add Member” at the bottom of the “Project” screen.
  2. Choose the “Song to Add” and the “Role” (“Can Edit” or “View Only”).
  3. Choose from the following 3 methods.
Method 1: Add by QR Code
  1. Click “Add by QR Code”.
  2. Scan the QR code on the other person’s SYNCRA “Account” screen with your Mac’s camera. You can also use “From Image File” or “From Clipboard Image” (a QR code saved to their phone via AirDrop also works).
  3. They receive “Add/Decline”. When they click “Add”, they join with the role you chose.
Method 2: Add by Invite Code
  1. Click “Create Invite Code”.
  2. Send the displayed code to them with “Copy Code”. A code can be used only once and is valid for 7 days.
  3. When they enter the code, a “Requests to Join” entry arrives on the “Members” tab. Click “Add” to confirm that they join (you can also choose “Decline”).
Method 3: Add by SYNCRA ID
  1. Enter the other person’s SYNCRA ID (for example, @syncra_1) in the field and click “Add” (Return also works).
  2. For people in your “Friends” list, you can also invite them with “Add” on their row.
  3. They receive “Add/Decline”.
For the invited person
  1. “You’re invited to ‘◯◯’” appears on the “Project” screen. Click “Add” to join (you can also choose “Decline”). You can also respond with the “Add” and “Decline” buttons in the notification.
  2. If you received an invite code, open “Join with an Invite Code You Received…”, enter the 32-digit code, and click “Join” (hyphens and spaces are fine whether you include them or not).
  3. After you join, the song is received into “Music/SYNCRA” automatically and linked. If it cannot be decided automatically, choose it with “Choose a Song on This Mac…”.
Role differences
  • “Owner”: Can invite, manage members, and edit.
  • “Can Edit”: Can add and edit notes and share recordings.
  • “View Only”: Can only view notes and status.

Only the owner can invite and manage members.

11

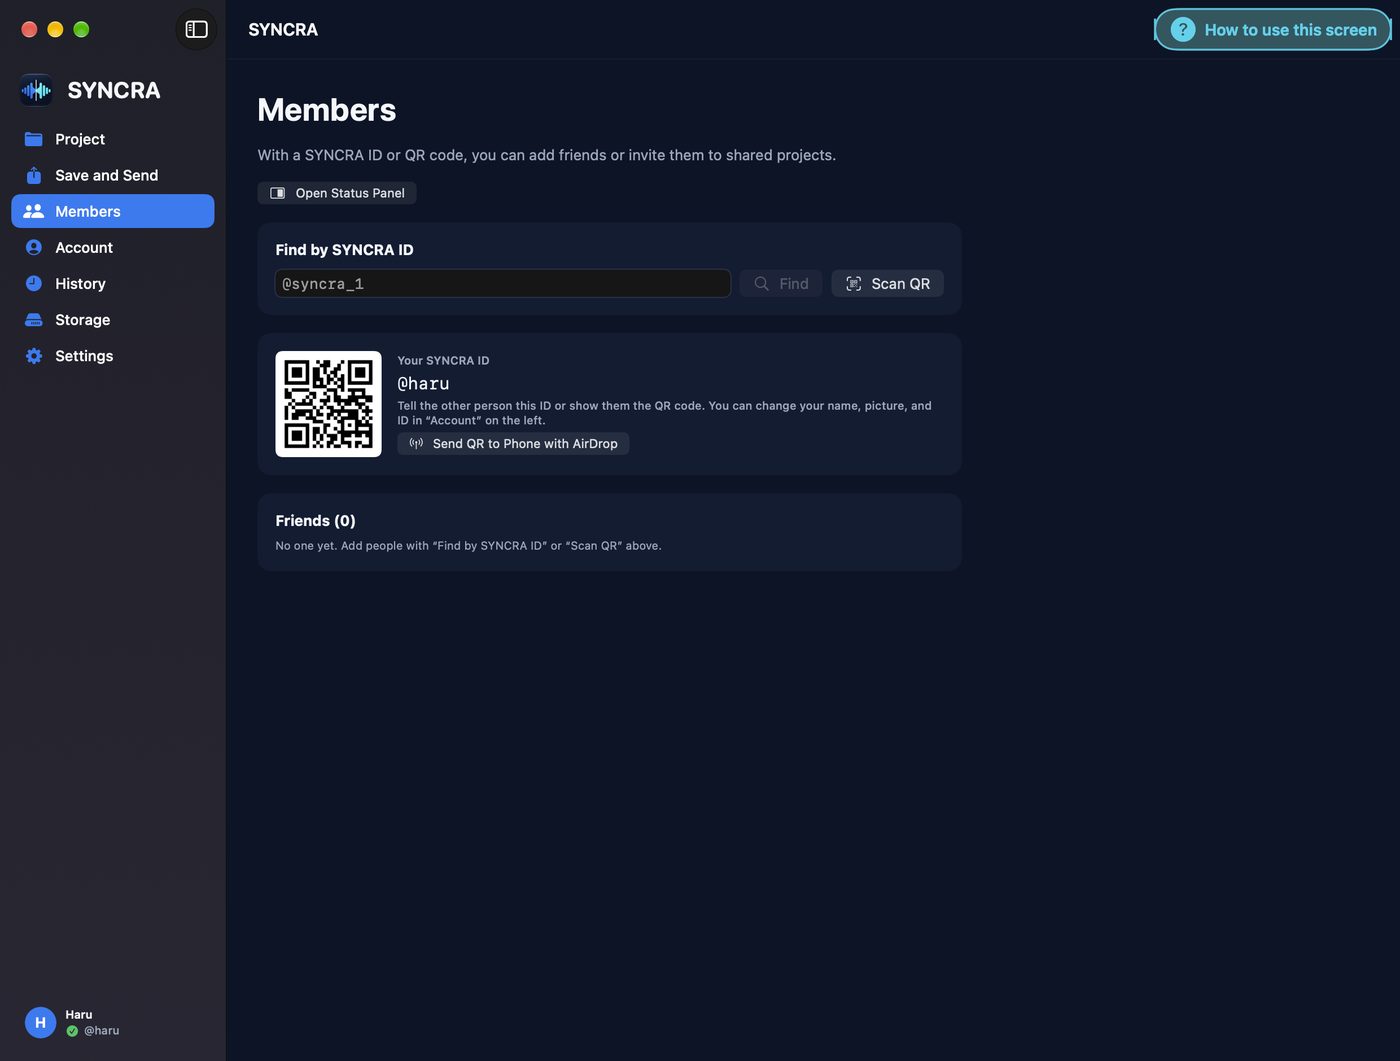
Add Friends (SYNCRA ID and QR)

123456
  1. Open Members on the left, enter someone's SYNCRA ID and press Search. Scan QR works too.
  2. Show your SYNCRA ID and QR code, or send the QR to your phone by AirDrop.
  3. They receive Add / Decline; once added, they appear in your Friends.

Being Friends makes it easier to invite them to your next project.

Parts of the screen

  1. Open Status PanelThe status panel can be opened from here too.
  2. Search by SYNCRA IDEnter their ID and press Search.
  3. Scan QRFind someone by scanning their QR code.
  4. Your SYNCRA IDShow your ID and QR code so they can add you.
  5. Send QR to your phone by AirDropWith the QR on your iPhone, just show it to their Mac to be added.
  6. FriendsPeople you added. Makes the next invitation quicker.
More details (in-app guide)
Add a friend
  1. Open “Members” in the list on the left.
  2. Enter the other person’s ID (for example, @syncra_1) in “Find by SYNCRA ID” and click “Find” (you can also search with “Scan QR”).
  3. Click “Add to Friends” on the result.
  4. From the “Invite to Project” menu, choose “Invite as Can Edit” or “Invite as View Only” to invite them right away.
Tell others your ID
  • This screen shows your QR code and SYNCRA ID. Tell the other person your ID or show them your QR code.
  • With “Send QR to Phone with AirDrop”, you can send the QR to your iPhone. If you save it in your iPhone’s photos, the other person can add you by pointing their Mac’s camera at it.
Remove a friend

Choose “Remove from Friends” from the menu on the row in the “Friends” list.

12

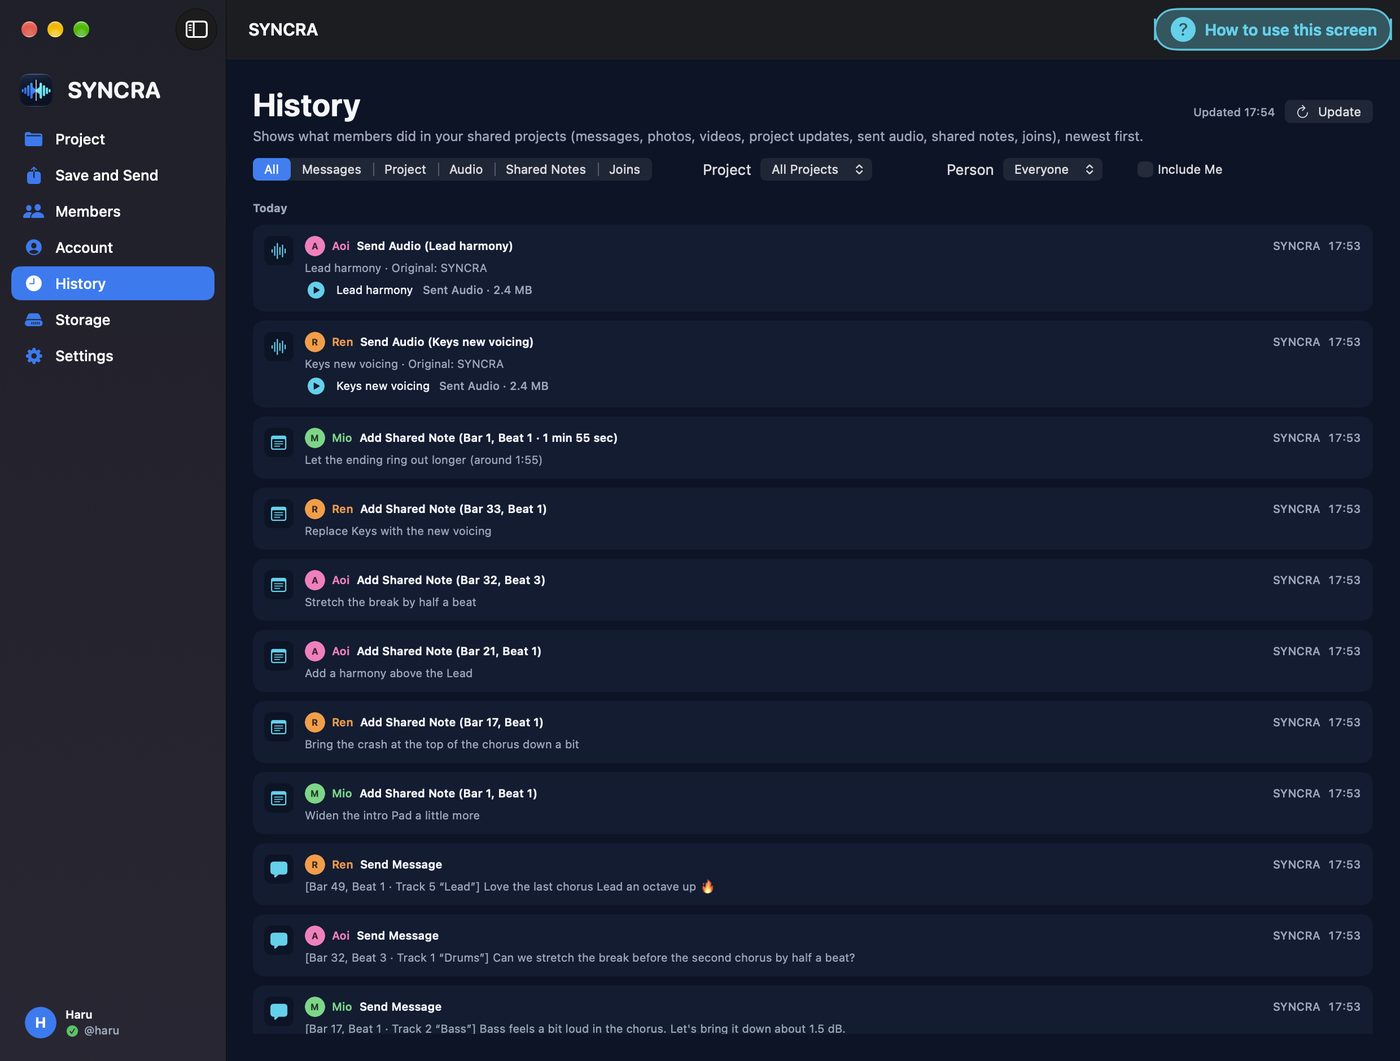
History: see what Members did

123456
  1. Open History on the left. What Members did in your Shared Projects (messages, photos, videos, project updates, audio sent, Shared Notes, joining) is listed newest first.
  2. Filter by All / Messages / Project / Audio / Shared Notes / Joined.
  3. You can also filter by project or person and include your own actions. Press Refresh for the latest.

Catch up on everything that changed while you were away.

Parts of the screen

  1. Filter by typeAll, Messages, Project, Audio, Shared Notes, Joined.
  2. Filter by projectAll projects or a single song.
  3. Filter by personPick a Member to see only their actions.
  4. Include myselfAdds your own actions to the list.
  5. ActivityWho did what (position, content), in which song and when. Newest first.
  6. RefreshReloads to the latest state.
More details (in-app guide)
How to read it
  1. Open “History” in the list on the left. Messages, photos, videos, project updates, audio sent, Shared Notes, and joins are listed by date.
  2. Filter by “Type”, “Project”, and “Person”. Turn on “Include Me” to also show your own actions (by default, only others’ actions are shown).
  3. Audio rows can be played with ▶. Photo and video rows open when you click them.

It refreshes automatically every 30 seconds. You can also refresh right away with “Update”.

13

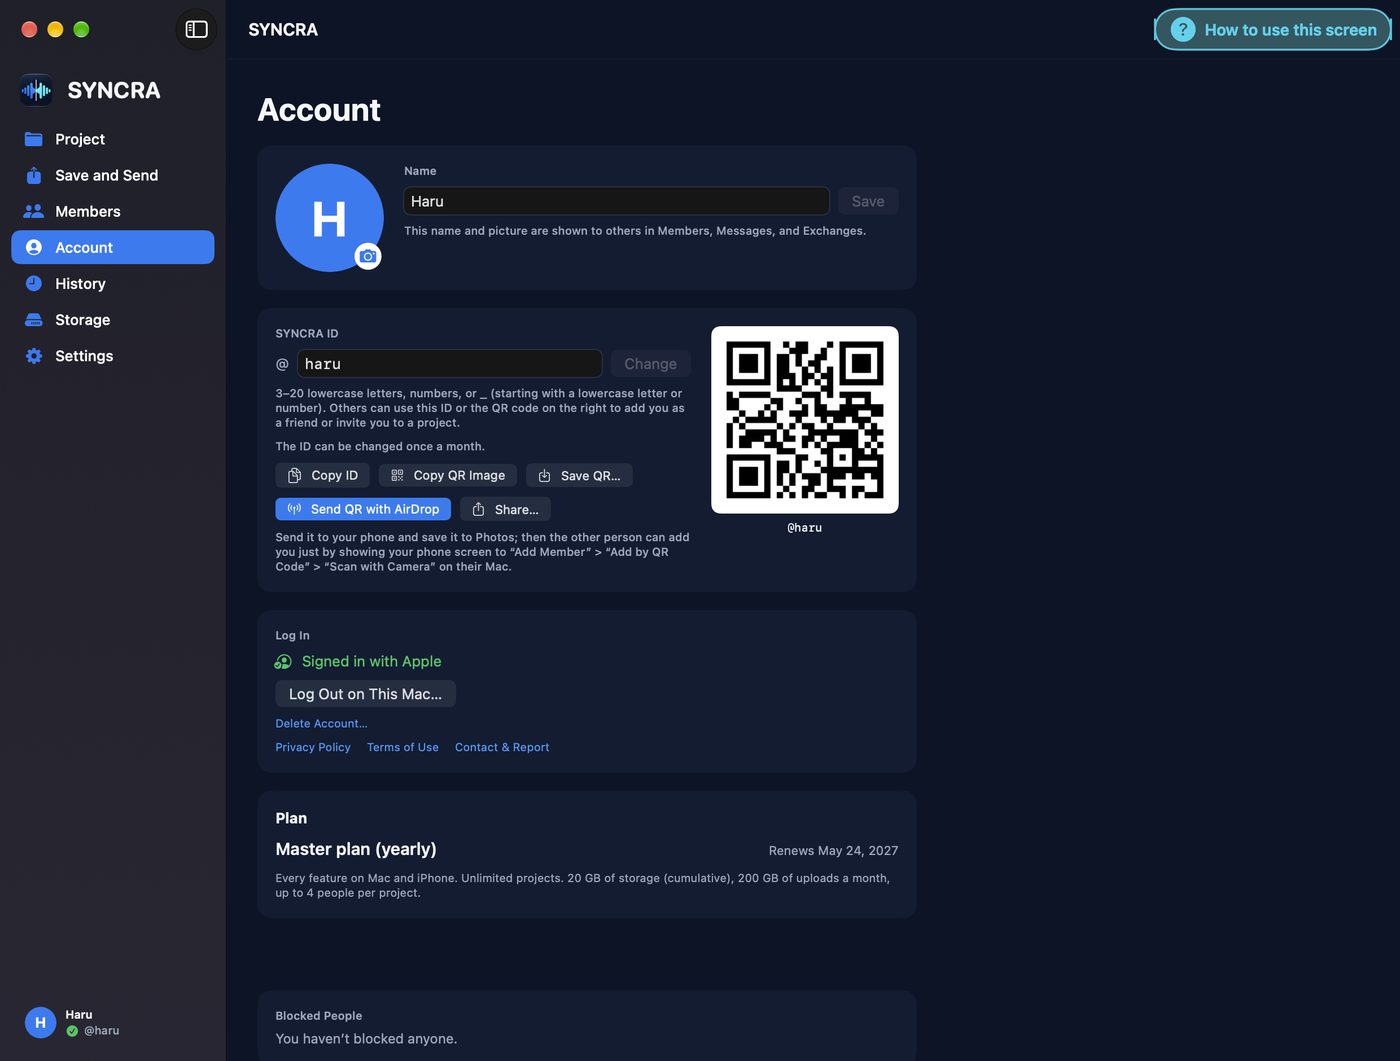
Set up your account

123456
  1. Open Account on the left to change your name and picture. Others see them in Members, Messages and Exchanges.
  2. Your SYNCRA ID can be changed once a month. Copy the ID or QR image, save the QR, send it by AirDrop or share it.
  3. Check your sign-in status, sign out on this Mac or delete the account here too.

Send the QR to your phone, and a friend can scan it from Add Member on their Mac.

Parts of the screen

  1. PictureChange your profile picture with the camera button.
  2. NameShown to others in Members, Messages and Exchanges.
  3. SYNCRA ID3–20 lowercase letters, digits or _. Can be changed once a month.
  4. Share ID and QRCopy ID, copy QR image, save QR, AirDrop, share.
  5. QR codeOthers scan it to add you as a friend or invite you to a project.
  6. Sign-inSign-in status, sign out on this Mac, delete the account.
More details (in-app guide)
Change your name, picture, and ID
  1. Open “Account” in the list on the left (you can also open it from your own icon at the bottom left).
  2. For the picture, click to choose one or drag an image in. The center is cropped to a square. You can remove it with “Remove Picture”.
  3. For the name, enter it in the field and click “Save”.
  4. For the SYNCRA ID, enter it in the field and whether it can be used is shown automatically. If it can be used, click “Change”.

A SYNCRA ID is 3–20 characters of lowercase letters, numbers, and _ (it must start with a lowercase letter or a number). You can change it only once per month, and you cannot change it to an ID that another person is using.

Uses for the QR code

With “Copy ID”, “Copy QR Image”, “Save QR…”, “Send QR with AirDrop”, and “Share…”, you can pass your ID or QR code to others.

Link your iPhone
  1. Click “Show QR Code” under “Link with iPhone”.
  2. In SYNCRA on your iPhone, click “Scan Mac QR Code” and scan this QR code. You can sign in to the same account without a password.
  3. If you requested access on your iPhone by entering a SYNCRA ID, your Mac shows “An iPhone is asking to sign in to SYNCRA” along with the device name and a number. Click “Allow” only when the same number is also shown on your iPhone’s screen.

Do not show the QR code to other people. An iPhone that scans it signs in with your account. It expires quickly and can be used only once.

Device management and logging out
  • With “Remove from List” under “Linked Devices”, you can remove that iPhone.
  • If you have lost an iPhone, use “Sign Out All Other Devices…”.
  • Even if you choose “Log Out on This Mac…”, the projects you added and the files on your Mac are not deleted.
14

Settings: language and panel size

123456
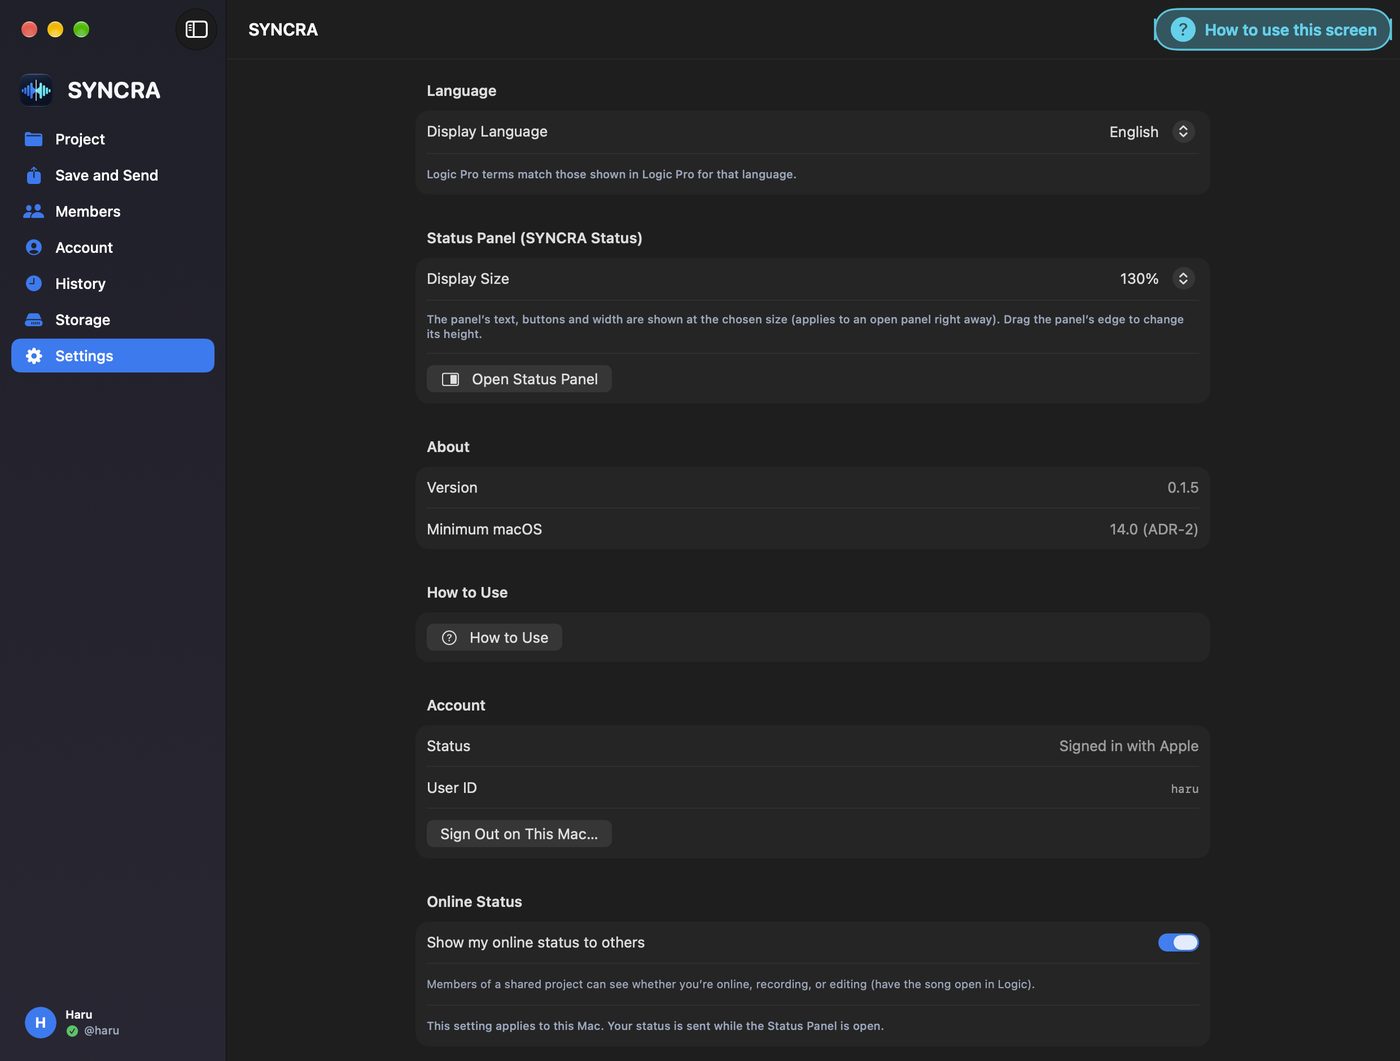
  1. Open Settings on the left. Choose a Display Language from 7 languages. Logic Pro terms follow that language's Logic Pro.
  2. Set the Status Panel's display size (text, buttons, width).
  3. The app version, the minimum macOS, How to Use and your account status are here too.

On every screen, How to Use at the top right shows the steps for that screen.

Parts of the screen

  1. Display LanguageChoose from 7 languages. Logic Pro terms follow Logic Pro in that language.
  2. Status Panel sizeSize of text, buttons and width (applies to an open panel immediately).
  3. Open Status PanelIt can be opened from here too.
  4. App infoVersion and the required macOS.
  5. How to UseReview the tutorial at any time.
  6. AccountSign-in status and user ID.
More details (in-app guide)
Settings items
  • “Language”: Choose the display language. It is saved as soon as you choose, and it switches when you click “Restart Now”.
  • “Status Panel (SYNCRA Status)”: Change the panel’s display size (80%–150%).
  • “How to Use”: View this tutorial again.
  • “Account”: Check your sign-in status and sign out on this Mac.
  • “Online Status”: Turn “Show my online status to others” on or off. When it is off, members see you as “Offline”, and recording and editing are not shown to them either (you can still see the members’ status as before).
  • “Notifications”: Choose on or off for notifications for each of: messages, projects added and updated, members coming online, Shared Notes, and join requests and invitations.
Allow notifications
  1. Click “Allow Notifications” under “Notifications”.
  2. If “SYNCRA notifications aren’t allowed in macOS” is shown, click “Open System Settings” and allow notifications for SYNCRA.

iPhone · iPad

The iPhone and iPad screens, part by part

Numbered screens from the real iPhone app (the iPad app has the same layout). People, songs and messages on screen are sample data.

01

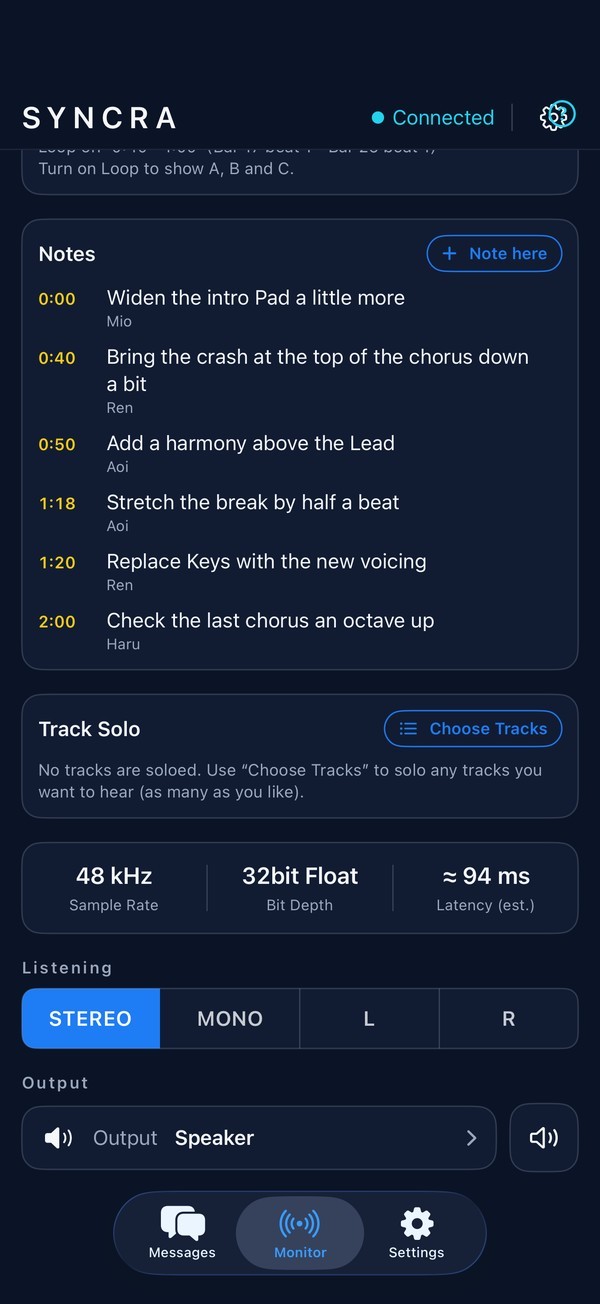
Monitor: hear Logic on iPhone and iPad

1234567891011
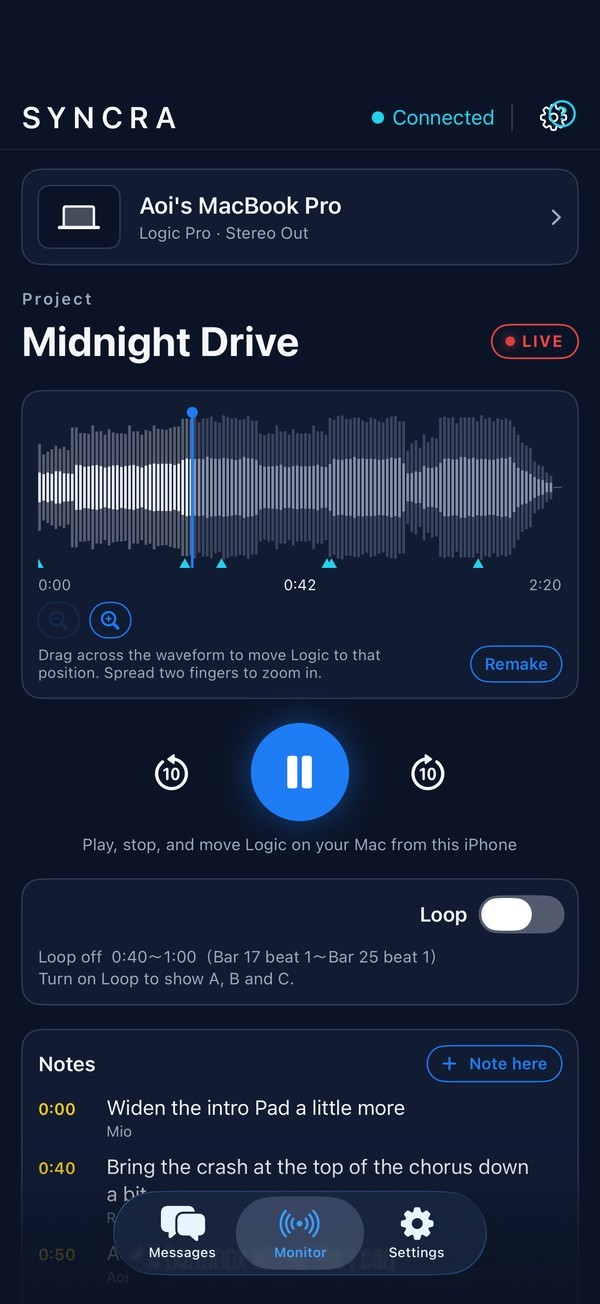
  1. Open SYNCRA on your Mac and insert SYNCRA Monitor on Logic's Stereo Out.
  2. Open the Monitor tab on your iPhone or iPad. It finds the Mac on the same Wi-Fi and connects (for a new Mac, confirm the 6-digit code once).
  3. Play Logic and the sound arrives uncompressed. You can also play, stop and move Logic from your iPhone or iPad.

No sound? On your iPhone, turn on SYNCRA in Settings › Privacy & Security › Local Network.

Parts of the screen

  1. ConnectedShows that the Mac is connected. The gear on the right opens connection details and settings.
  2. Connected MacThe Mac's name and what you hear (Logic Pro · Stereo Out). Tap it for connection details such as sample rate and round-trip time.
  3. Sound statusShows LIVE (receiving and playing), Waiting, Stopped or Muted.
  4. Whole-song waveformThe blue line is Logic's playhead. Drag across the waveform to move Logic there.
  5. Shared Note positionsThe light-blue ▲ marks show where Shared Notes are attached.
  6. Zoom and full viewYou can also spread two fingers to zoom. Full returns to the whole song.
  7. RemakeRebuilds the whole-song waveform by exporting from Logic (after you change the song).
  8. Play, stop, 10 sPlays or stops Logic on your Mac. The side buttons go back or ahead 10 seconds.
  9. LoopTurn it on to show loops A, B and C (see the next screen).
  10. Note hereAdds a Shared Note at the position you are hearing.
  11. Bottom tabsSwitch between Messages, Monitor and Settings.
More details (in-app guide)
Before connecting (Mac)
  1. Launch SYNCRA on your Mac.
  2. Insert the “SYNCRA Monitor” plug-in on Logic’s Stereo Out.
  3. Connect your Mac and iPhone to the same Wi-Fi.
Connect
  1. Open the “Monitor” tab at the bottom. It automatically searches for a Mac on the same Wi-Fi.
  2. If more than one Mac is found, choose the Mac to connect to.
  3. Only for the first connection to a Mac, a 6-digit number appears. Check that the same number is also shown on the SYNCRA Monitor screen on your Mac, and if it is the same, click “Match” on the Mac.
  4. When connected, “Connected to 〇〇” appears. From the second time on, it connects without a number.
If it doesn’t work
  • “Local network access is required”: On your iPhone, turn on SYNCRA in “Settings” > “Privacy & Security” > “Local Network” (you can open it from “Open Settings”).
  • With “Search Again”, you can search for the Mac again.
  • If the sound doesn’t arrive, check that it is playing in Logic and that you are on the same Wi-Fi.
Play, stop, and move
  • Use “Play in Logic” and “Stop Logic” to control Logic on your Mac. There are also “Back 10 Seconds” and “Forward 10 Seconds”.
  • Trace the waveform and the playhead in Logic moves to that position. Spread with two fingers to zoom in. “All” returns to showing the whole song.

SYNCRA must be running on your Mac, and Accessibility must be allowed. While the whole-song waveform is being created, Logic is brought to the front and operated on your Mac, so do not do other work on your Mac.
02

Loops: repeat the part you care about

12345
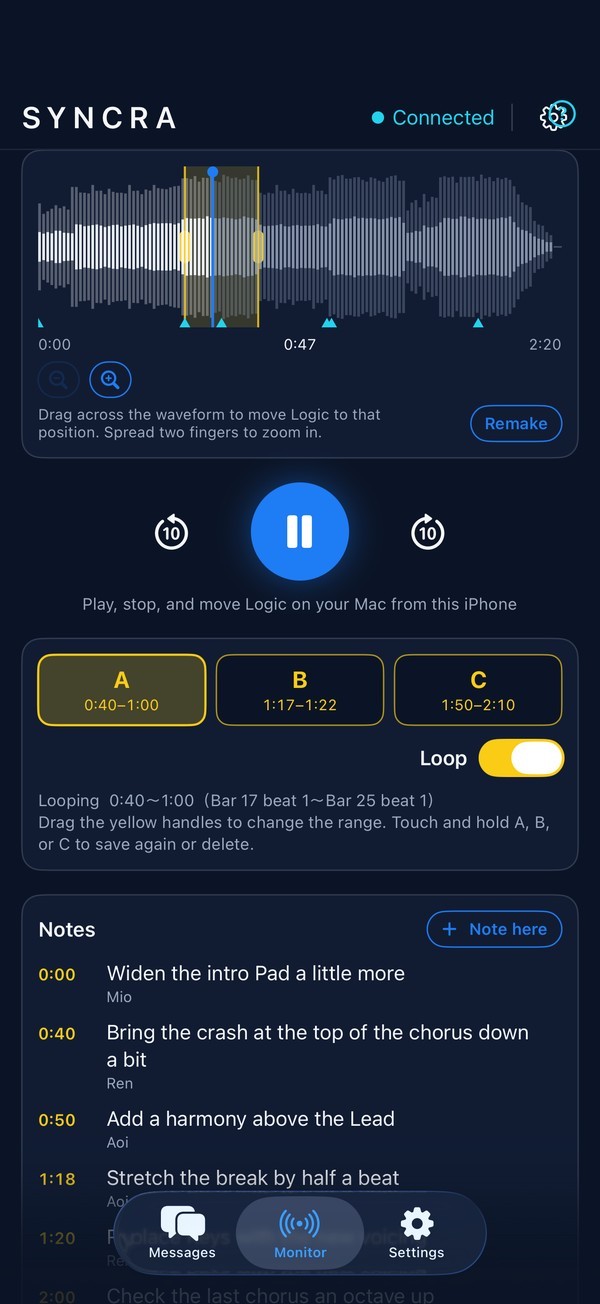
  1. Turn on Loop.
  2. Drag across the waveform to choose a range. Fine-tune it with the yellow handles.
  3. Save loops to A, B and C, then tap one to switch to it.

Loops switch Logic's cycle on your Mac, so you can repeat a part without touching the Mac.

Parts of the screen

  1. Loop rangeThe yellow band is the loop. Adjust it with the yellow handles on each side.
  2. Play, stop, 10 sRepeat the loop without touching the Mac.
  3. A, B, CSaved loops. Tap to switch; touch and hold to save again or delete.
  4. Loop on/offTurns Logic's cycle on or off.
  5. Current loopShows the range in time and in bars and beats.
More details (in-app guide)
Loop
  1. Turn on “Loop”.
  2. Trace the waveform left or right to select a range (you can also select it by tapping two points).
  3. With “Save current loop”, you can save it to A, B, or C. By pressing and holding, you can select a range and save it, save it again, or delete it.
  4. Tap A, B, or C to switch to that loop.

To set the loop range, you need to show locators in Logic’s position display.

03

Solo, listening mode and output

1234567
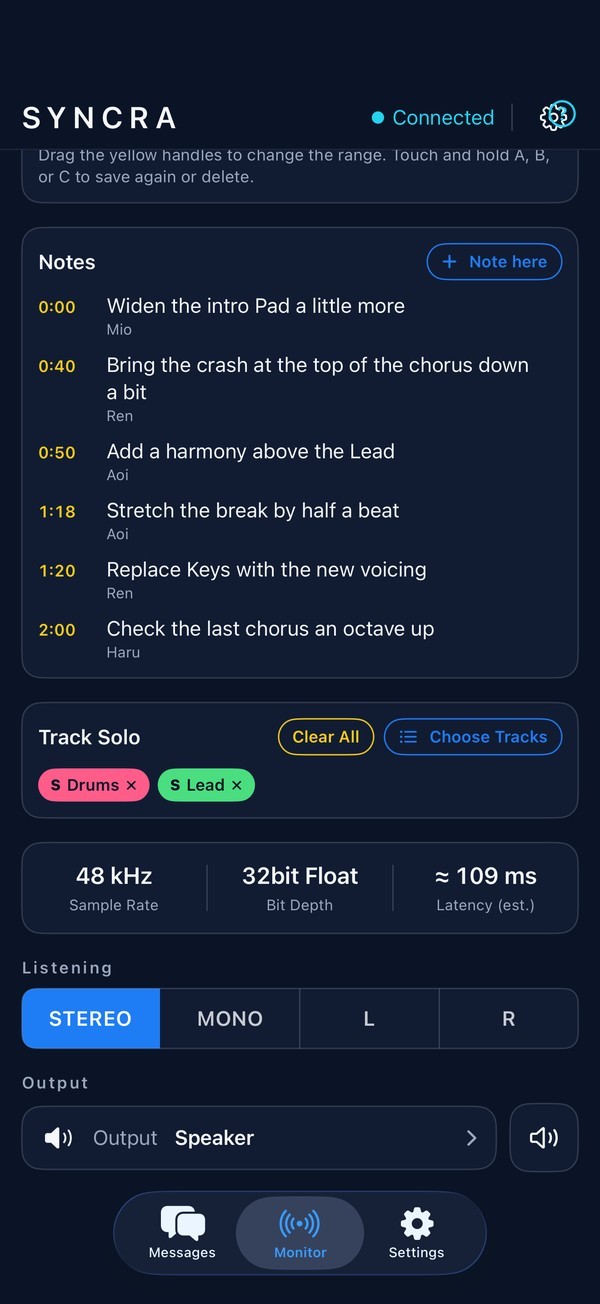
  1. Tap Choose Tracks to solo the tracks you want to hear (as many as you like).
  2. Soloed tracks are overlaid as color-coded waveforms.
  3. Choose how to listen (stereo, mono, left or right) and where the sound goes.

Bluetooth and AirPlay add delay. Use them for checking only.

Parts of the screen

  1. Soloed tracksTracks you have soloed. Tap × to remove one. Each soloed track's waveform appears in its own color.
  2. Clear AllRemoves every solo.
  3. Choose TracksPick the tracks to solo from Logic's track list (as many as you like).
  4. Audio infoSample rate, bit depth and estimated latency.
  5. ListeningSwitch between stereo, mono, left only and right only.
  6. OutputChoose the speaker, earphones, AirPlay and more.
  7. Mute iPhoneMutes only the iPhone. Logic keeps playing.
More details (in-app guide)
Waveform of soloed tracks

With “Choose Tracks”, you can solo the tracks you want to hear (any number of them). When you solo them, a waveform of just those tracks is created. The light gray one is the waveform of the whole song.

Output and muting
  • With “Output”, you can choose the iPhone speaker, earphones, AirPlay, and so on. Bluetooth and AirPlay delay the sound. Please use them for checking only.
  • With “Mute iPhone”, you can silence only the iPhone. Playback in Logic does not stop.
04

Add a Shared Note right from the monitor

1234
  1. While playing, or after picking a spot on the waveform, tap Note here.
  2. Type the note and tap Add.
  3. It becomes a Shared Note for all members and SYNCRA on the Mac.

Tap a note's time to move the Logic playhead on your Mac to that position.

Parts of the screen

  1. Note hereAdds a note at the position you are hearing (or the one you picked on the waveform).
  2. Note positionTap to move the Logic playhead on your Mac there.
  3. Note textAll members and SYNCRA on the Mac receive the same note.
  4. AuthorThe member who added the note.
More details (in-app guide)
Steps
  1. During playback, or after selecting a position on the waveform, tap “Note here”.
  2. Enter the content and tap “Add”.
  3. It is delivered as a Shared Note to all members and your Mac.

If this song is not linked to a SYNCRA Shared Project, you cannot add a note. Add the song in SYNCRA on your Mac. People with “View Only” cannot add notes.

05

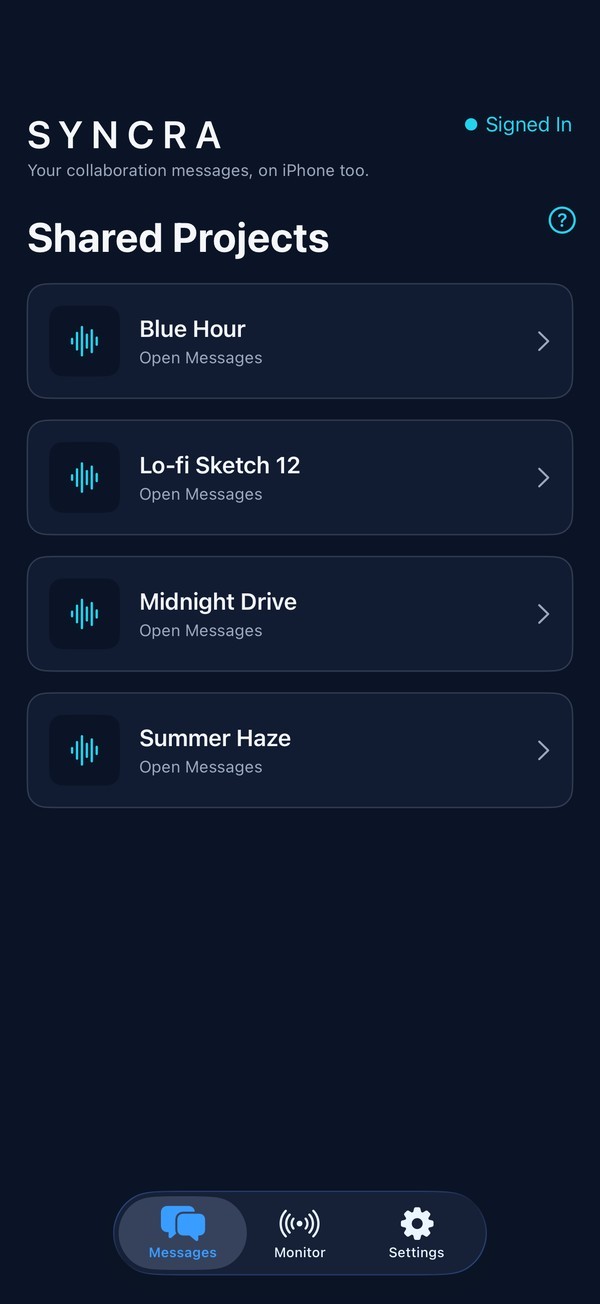
Your Shared Projects

1234
  1. Open the Messages tab at the bottom.
  2. Tap a project to open it.
  3. Inside, switch between four tabs: Messages, Shared Notes, Update History and Members.

Projects are created in SYNCRA on the Mac. Your iPhone and iPad list the projects you have joined.

Parts of the screen

  1. Signed InYou receive messages and Shared Notes with the account you are signed in to.
  2. How to useOpens help for this screen.
  3. Shared ProjectsProjects you have joined. Tap one to open its tabs.
  4. Bottom tabsSwitch between Messages, Monitor and Settings.
More details (in-app guide)
How to use it
  1. Open the “Messages” tab at the bottom.
  2. Tap a project to see its messages, Shared Notes, Update History, and members.

Creating projects and inviting people are done in SYNCRA on your Mac. If nothing is shown, create one on your Mac or accept an invitation.

The 4 tabs inside a project
  • “Messages”: Read and send.
  • “Shared Notes”: Notes attached to positions in the song.
  • “Update History”: The list of the project’s versions.
  • “Members”: Members, their roles, and whether they are online.
06

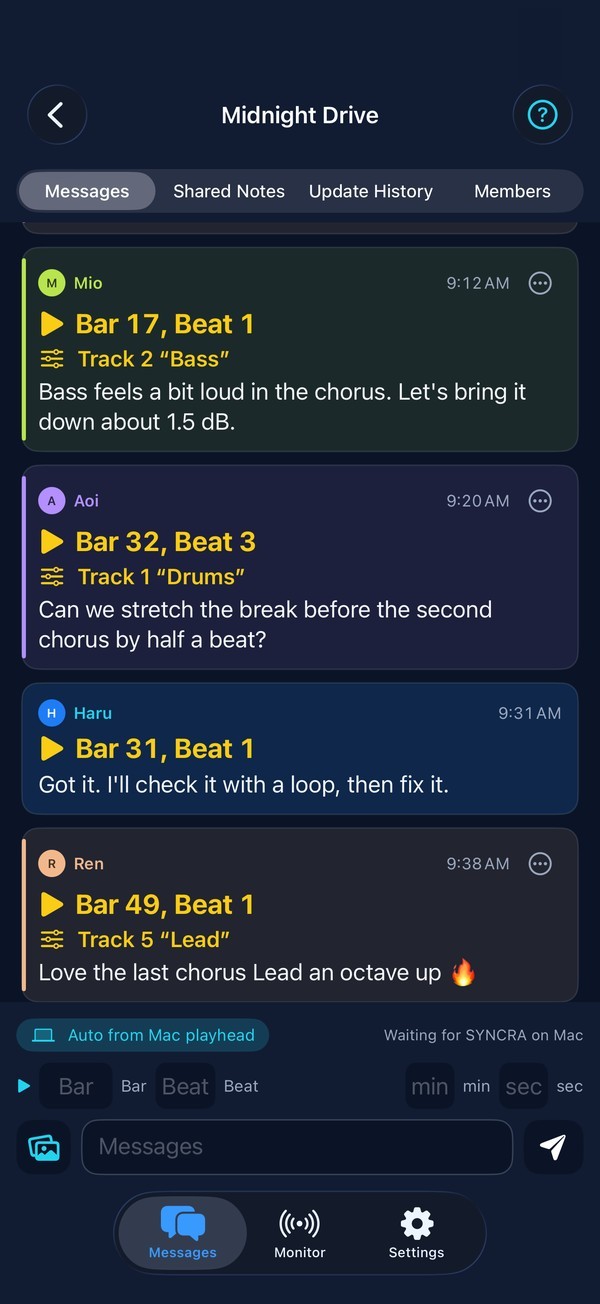
Messages tied to a position

123456789101112
  1. Open a project's Messages tab.
  2. Enter a bar and beat (or minutes and seconds), or use Auto from Mac playhead.
  3. Type and send. You can attach photos and videos too.

Tap a message that has a position to move the Logic playhead on your Mac there.

Parts of the screen

  1. How to useOpens help for this screen.
  2. Four tabsMessages, Shared Notes, Update History and Members.
  3. Sender and timeEach member has their own color.
  4. Song positionTap to move the Logic playhead on your Mac to this position.
  5. TrackShows which track the message is about.
  6. Your messagesMessages you sent are shown in a different color.
  7. Auto from Mac playheadWhen on, the position of Logic's playhead on your Mac is filled in.
  8. Bar and beatEnter the position in bars and beats.
  9. Minutes and secondsOr enter the position in minutes and seconds.
  10. Photos and videosAttach photos or videos.
  11. SendSends the message.
  12. Report or BlockTap “…” on someone else’s message (or touch and hold it) to choose Report This Message… or Block [name]…. Only the operator sees reports; the other person is not told.
More details (in-app guide)
Send
  1. Open the project’s “Messages” tab.
  2. Enter your message in the field at the bottom and tap the send button.
  3. When you get close to the character limit, “〇 characters left” appears.
Attach a position
  1. In the position field, enter “Bar” and “Beat” (or “min” and “sec”).
  2. If you use “Auto from Mac playhead”, the position of the playhead in Logic on your Mac is entered.
  3. When you tap a received message that has a position, the playhead in Logic on your Mac moves to that position.

The ranges are: Bar 1–9999, Beat 1–64, min 0–1439, and sec 0–59. If the position is empty, the message is written at Bar 1, Beat 1.

Attach photos and videos
  1. Tap “Attach Photos or Videos” and choose.
  2. There is a limit on how many you can attach to one message. Items over the limit are not attached, and a notice appears.
  3. While sending, the progress is shown.

“View Only” members cannot send photos or videos (they can send text).

07

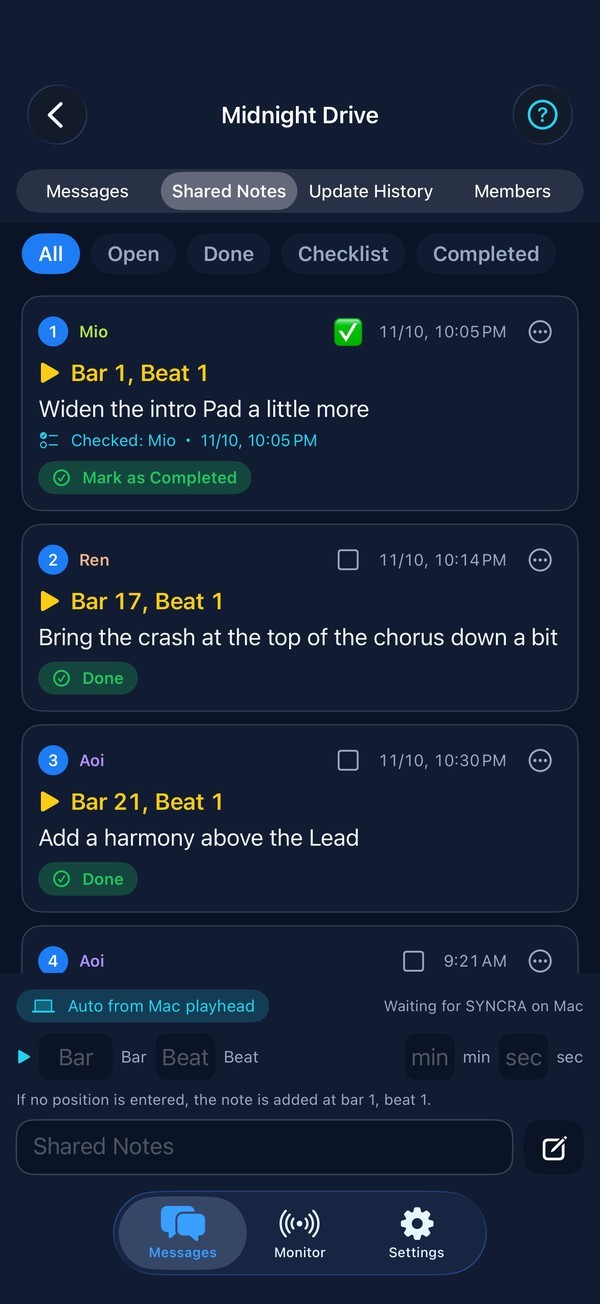
Shared Notes: track every fix together

12345678910
  1. Open a project's Shared Notes tab.
  2. Use the filters at the top: All, Open, Done (finished notes), Checklist, and the second Done (finished checklist items).
  3. Tap □ to add a note to the checklist, then tap Mark as Done when you've done it.

“Done” under a note means its task is finished. “Mark as Done” moves a ✅ checklist item to the second Done filter. All members see both.

Parts of the screen

  1. Shared Notes tabNotes attached to positions in the song.
  2. FiltersAll, Open, Done (finished notes), Checklist, and the second Done (finished checklist items).
  3. ChecklistTap □ to add a ✅ and put the note on everyone's checklist.
  4. Note positionTap to move the Logic playhead on your Mac there.
  5. Checked byWho added it to the checklist, and when.
  6. Mark as DoneTap when you have finished a checklist item. It moves to the second Done filter.
  7. DoneMarks that the note's task is finished. Tap to reopen it.
  8. Entering a positionUse Auto from Mac playhead, or enter bars and beats or minutes and seconds. Empty means bar 1, beat 1.
  9. Write and sendSend the note to all members and the Mac.
  10. Report or BlockTap “…” on someone else’s Shared Note (or touch and hold it) to choose Report This Shared Note… or Block [name]…. Messages and Shared Notes from people you block are hidden (you can unblock them anytime in Settings).
More details (in-app guide)
Write a note
  1. Open the project’s “Shared Notes” tab.
  2. Enter a position, write the content, and send it. If the position is empty, the note is written at Bar 1, Beat 1.
  3. The note is delivered to all members and your Mac.
Working with notes
  • Switch the state with “Done” and “Resume”. When you tap the position button on a note, the playhead in Logic on your Mac moves to that position.
  • Tap the □ at the top right of a note and a ✅ is added, and the note goes into all members’ checklist. Tap it again to remove it. Move items with “Mark as Completed” and “Back to Checklist”.
  • With the buttons at the top, you can filter by “All”, “Open”, “Done”, “Checklist”, and “Completed”.
  • You can delete notes you wrote (they remain in the history).

Writing Shared Notes and marking them done requires editor access or higher. People with “View Only” can only read.

Done, Checklist and Completed: what they mean
  • "Done": the note’s matter is settled. Everyone can see it. "Resume" puts it back to Open.
  • "Checklist": things to act on later. Tap the □ at the note’s top right to get ✅ and add it to everyone’s checklist. Tap again to remove it.
  • "Completed": when you have acted on a ✅ note, tap "Mark as Completed". If that was a mistake, "Back to Checklist" undoes it.
  • Filters: "Open" = not done yet, "Done" = done, "Checklist" = ✅ and not yet completed, and "Completed" = ✅ and completed.

On a ✅ note, the button changes to "Mark as Completed" / "Back to Checklist" (on a note without ✅ it is "Done" / "Resume"). All of this is shared with every member.

When changed at the same time

If another member changed it first, the latest content is shown. Check it, and then try the action again.

08

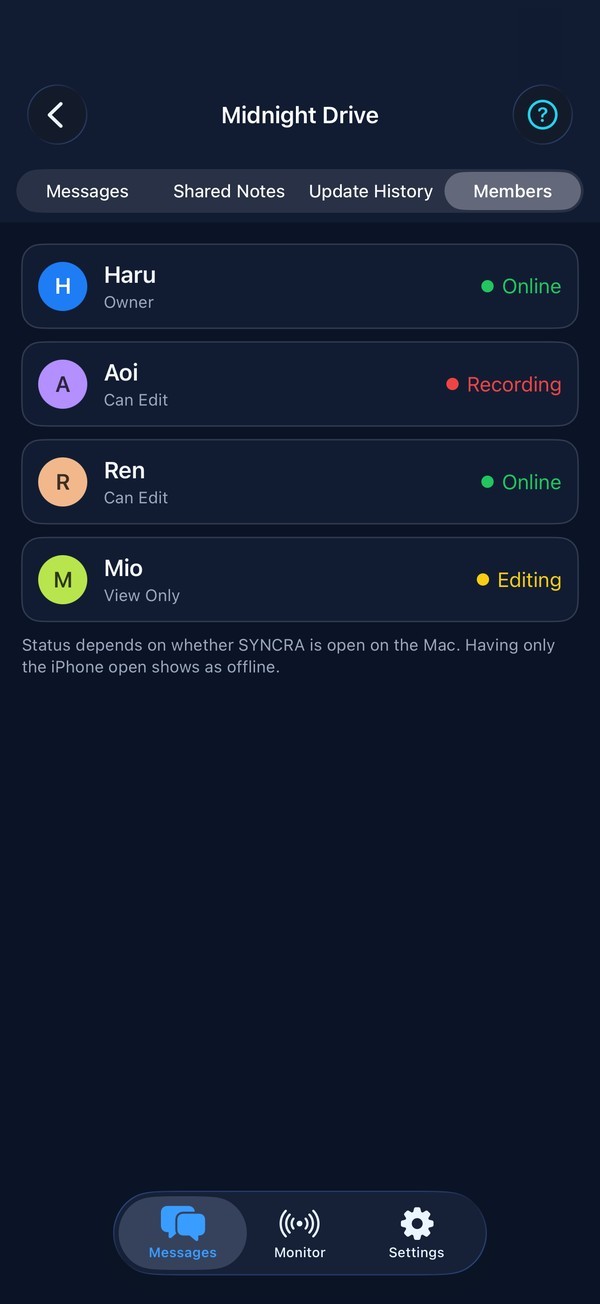
Members and what they are doing now

123456
  1. Open a project's Members tab.
  2. Check each name and role (Owner, Can Edit, View Only).
  3. Each member's current status (Online, Recording, Editing and more) appears on the right.

Status depends on whether SYNCRA is open on that member's Mac. With only the iPhone open, they show as offline.

Parts of the screen

  1. Members tabEveryone in the project.
  2. RoleOwner, Can Edit or View Only.
  3. OnlineSYNCRA is open on their Mac.
  4. RecordingThey are recording on their Mac.
  5. EditingThey are editing the project in Logic on their Mac.
  6. How status worksIt depends on whether SYNCRA is open on their Mac.
More details (in-app guide)
Update History
  • Newer versions are listed newest first.
  • Playing audio and opening in Logic are done in SYNCRA on your Mac.
Members
  • The name, @ID, and role (“Owner”, “Can Edit”, “View Only”) are shown.
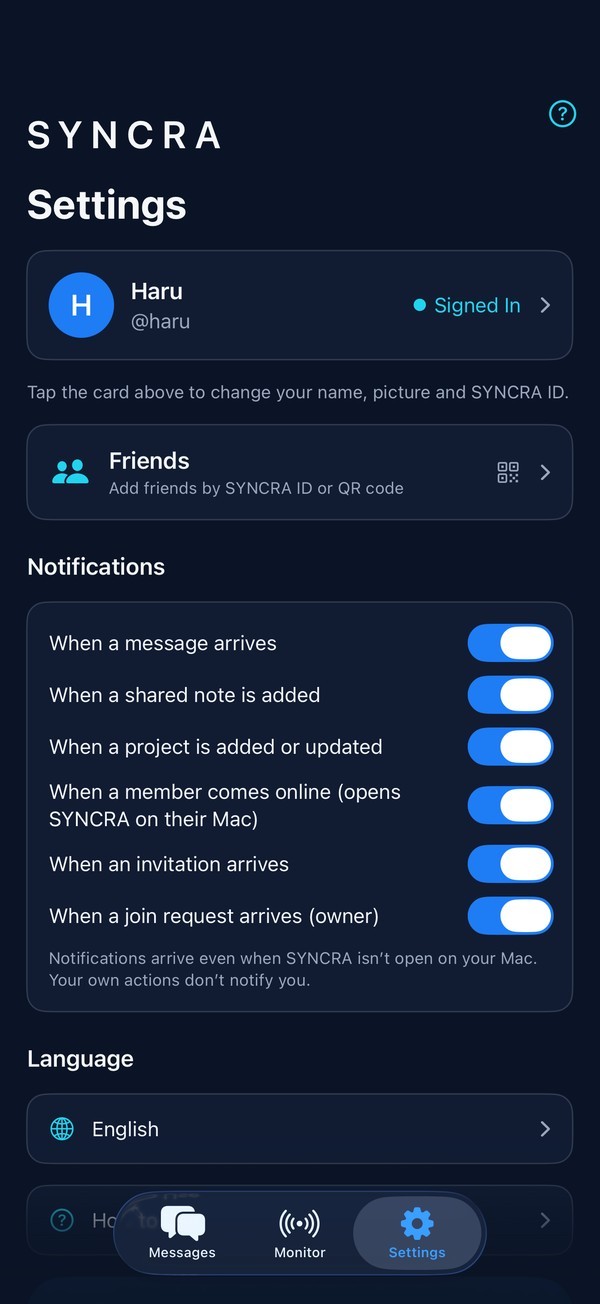
  • Status is determined by whether SYNCRA is open on the Mac. If only the iPhone is open, the status is “Offline”.
09

Settings: profile, notifications and language

12345
  1. Open the Settings tab at the bottom.
  2. Use the card at the top to change your name, picture and SYNCRA ID.
  3. Turn each kind of notification on or off, and choose the language or open How to Use.

Notifications arrive even when SYNCRA isn't open on your Mac. Your own actions don't notify you.

Parts of the screen

  1. How to useOpens help for this app.
  2. ProfileTap to change your name, picture and SYNCRA ID.
  3. FriendsAdd friends by SYNCRA ID or QR code.
  4. NotificationsTurn each kind on or off: messages, Shared Notes, project updates, members coming online, invitations and join requests.
  5. LanguageSwitch the display language right away (7 languages).
More details (in-app guide)
Profile
  1. Tap the card at the top of the “Settings” tab.
  2. Tap the picture to choose from your photos. You can remove it with “Remove Picture”.
  3. Enter your name and tap “Save”.
  4. For the SYNCRA ID, whether it can be used is shown. If it can be used, tap “Change”.

A name or picture you changed on your Mac is also reflected on your iPhone within a few seconds.

A SYNCRA ID is 3–20 characters of lowercase letters, numbers, and _ (it must start with a lowercase letter or a number). You can change it only once per month, and you cannot change it to an ID that another person is using.

Friends
  1. In the Settings tab, tap “Friends”.
  2. Enter the other person’s ID in “Find by SYNCRA ID” and tap “Find”, or scan their QR code with “Scan with Camera”. If you received the QR code as an image (in a messaging app, for example), choose it with “From Photos”.
  3. When the person is found, tap “Add to Friends”.

You can also scan a SYNCRA QR code with the iPhone Camera app: SYNCRA opens and finds the person. Your own ID and QR code are on this screen too; send the image with “Send QR Code”.

Invite friends to shared projects in SYNCRA on your Mac.

Notifications

You can choose on or off for each type. Notifications arrive even if SYNCRA on your Mac is not open. You are not notified of your own actions. If they are not allowed, allow them in your iPhone’s “Settings” > “Notifications” > “SYNCRA”.

Storage and purchases
  • Under Storage, a ring shows how much you have used and what is left. During the free trial it shows when the trial ends and the time left; for a Single Pass, the deadline and time left for each project.
  • Under Purchase & payment you can buy a plan, restore purchases or cancel. Prices and rules are on the “Plans and Invitation Bonus” page.
Language and signing out
  • Tap “Language” to switch the display language right away.
  • Tap “Sign Out on This iPhone” and you are signed out after a confirmation.
  • From “How to Use”, you can view this tutorial again.

Getting started

Install on your Mac, insert in Logic, pair your iPhone or iPad.

No complicated setup.

1
Install SYNCRA for Mac

Open the ZIP and move SYNCRA to Applications. It is notarized by Apple, so it opens right away.

2
Create an account

On Mac, iPhone or iPad, click Sign in with Apple and your account is created on the spot. With the same Apple Account, Mac and iPhone share one account. The Master plan includes a 7-day free trial (a payment method is required at purchase; cancel during the trial and you pay nothing).

3
Insert SYNCRA Monitor in Logic

Put the plug-in on Logic Pro's Stereo Out and Logic's audio is sent to your iPhone and iPad.

4
Pair your iPhone or iPad

In SYNCRA on the iPhone or iPad, scan the QR code or enter the 6-digit code shown on the Mac. Use the same Wi-Fi.

5
Listen, check, discuss

Move on the waveform, check with loops and solo, drop Shared Notes and finish the track with your Members.

Pricing

Pricing

SYNCRA

Master plan (all features)

USD 15.99 / month
USD 159.99 / year (excluding tax). In Japan: JPY 2,500 / month, JPY 25,000 / year (tax included). Outside Japan and the US, iPhone/iPad in-app purchases are priced in local currency by Apple.
  • 7-day free trial (free if you cancel during it)
  • Monitor, loops, solo, Shared Notes
  • Messages, photos and videos, audio sharing
  • Create Shared Projects
Mac · iPhone · 1 project

Single Pass

USD 7.99 / 20 days
One project per purchase · no automatic renewal · Mac app and iPhone/iPad app. In Japan: JPY 1,200 (tax included).
  • Every feature for one project (Mac app; on iPhone and iPad, the monitor, Shared Notes and playhead control for that project’s song)
  • 5 GB of storage
  • Use another on the same project to extend 20 days
iPhone · iPad

Monitor plan

USD 1.99 / month
USD 19.99 / year (excluding tax). In Japan: JPY 300 / month, JPY 3,000 / year (tax included). In-app purchase on iPhone and iPad only; outside Japan and the US, Apple's local-currency price applies.
  • iPhone/iPad-only monitor
  • Monitor your own Mac on iPhone and iPad, with any song

This plan alone does not let you join Shared Projects.

Paid plans for the Mac app are purchased inside the app (payments by Paddle). Cancelling stops future renewal charges. Refund policy · Seller information

Get started

Your next track, finished together.

The Mac app is available now.
Requirements: macOS 14 or later with Logic Pro · iOS / iPadOS 17 or later

Download for Mac ↓App Store — Coming Soon

FAQ

FAQ

What is SYNCRA?

A collaboration app that lets you hear the Logic Pro project on your Mac from an iPhone or iPad and review and fix it with your Members.

How do I create an account?

Click Sign in with Apple on the first screen of the Mac or iPhone app and your account is created right away (Mac version 0.1.5 or later). If you have an account with an email and password, use “Sign in with email and password” on the Mac sign-in screen.

Can I use it on iPhone or iPad alone?

To hear audio you need SYNCRA for Mac (macOS 14 or later) and Logic Pro.

I cannot hear anything

Check that SYNCRA Monitor is on Logic's Stereo Out, that both devices are on the same Wi-Fi, and that SYNCRA is allowed under Settings › Privacy & Security › Local Network on the iPhone or iPad.

Does the free trial turn into a paid plan?

Yes. The first 7 days of your first Master plan purchase are a free trial (once per person, up to 1 GB). Cancel during the trial and you pay nothing (on the App Store, at least 24 hours before it ends). Otherwise it switches to the paid plan when the trial ends. If you cancel after only the trial, cloud Shared Projects from the trial are deleted 30 days after it ends.

Cancelling and refunds

Cancelling stops future renewal charges. On iPhone and iPad: Settings › your name › Subscriptions. See the refund policy.

How do I delete my account?

In the app: Settings › Delete Account.